Grove - Multichannel Gas Sensor
Introduction
|
|
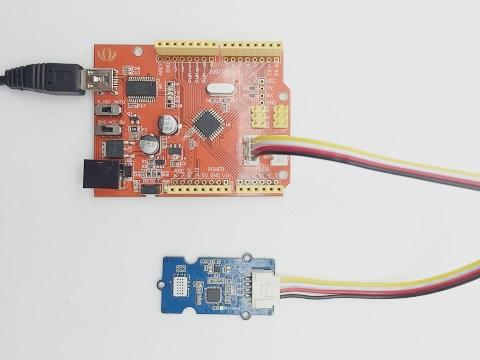
Grove – Multichannel Gas sensor is a environment detecting sensor with a built in MiCS-6814 which can detect many unhealthful gases, and three gases can be measured simultaneously due to its multi channels, so it can help you to monitor the concentration which more than one gas.
This sensor belongs to Grove system, and you can plug it onto the Base shield and work with Arduino directly without any jumper wires. The interface of it is I2C, so plug it onto the I2C port of Base shield, then you can start to work it.
Caution
The sensor value only reflects the approximated trend of gas concentration in a permissible error range, it DOES NOT represent the exact gas concentration. The detection of certain components in the air usually requires a more precise and costly instrument, which cannot be done with a single gas sensor. If your project is aimed at obtaining the gas concentration at a very precise level, then we do not recommend this gas sensor.
Before usage
Related Reading
We suggest you to read those knowledge before using the Gas sensor, it’ll help you to learn more about Arduino and our products, and also it’ll let you to use open souse hardware more easier.
After reading that you will know how to use Base shield with Grove products to work well with Arduino. Let’s start it !
To be prepared
This tutorial will include some necessary products:
- Arduino UNO R3 or Seeeduino v4
- Base Shield
- Grove - Multichannel Gas Sensor
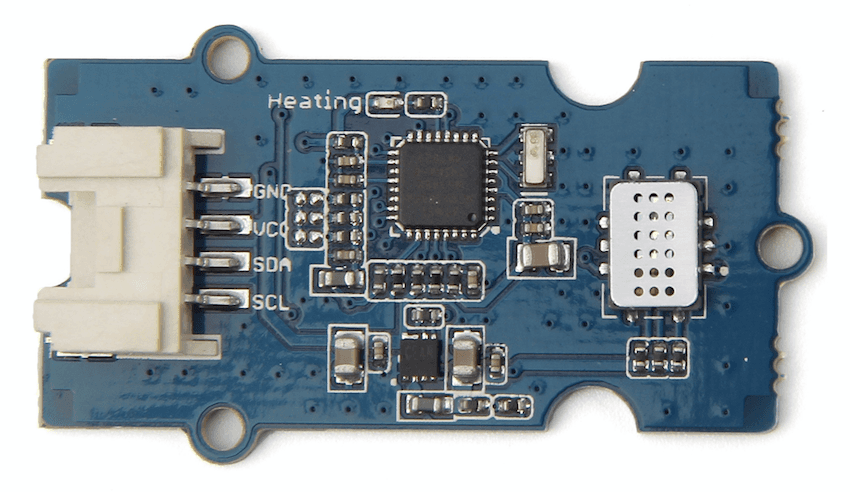
Hardware Overview
Four pins are pointed out from the figure above
| Pin Label | Description |
|---|---|
| GND | Connect to ground |
| VCC | Power supply: 3.3V - 5V |
| SDA | I2C data |
| SCL | I2C clock |
The power supply is between 3.3V and 5V, so this sensor can be compatible with a micro-controller whose output voltage is 3.3V.
Features
- Three fully independent sensing elements on one package
- Built with ATmega168PA
- I2C interface with programmable address
- Heating power can be shut down for low power
- Detectable gases
- Carbon monoxide CO 1 – 1000ppm
- Nitrogen dioxide NO2 0.05 – 10ppm
- Ethanol C2H6OH 10 – 500ppm
- Hydrogen H2 1 – 1000ppm
- Ammonia NH3 1 – 500ppm
- Methane CH4 >1000ppm
- Propane C3H8 >1000ppm
- Iso-butane C4H10 >1000ppm
Block Diagram

Platforms Supported
Electrical Characteristics
| Item | Condition | Min. | Typ. | Max. | Unit |
|---|---|---|---|---|---|
| Voltage | - | 3.1 | 3.3 | 5.25 | V |
| Ripple | @Max Power | - | 80 | 100 | mV |
| Heating Power | - | - | - | 88 | mW |
| Max Power | - | - | - | 150 | mW |
| ADC Precision | - | - | 10 | - | Bits |
| I2C Rate | - | - | 100 | 400 | kHz |
| VIL | @I2C | -0.5 | - | 0.99 | V |
| VIH | @I2C | 2.31 | - | 5.25 | V |
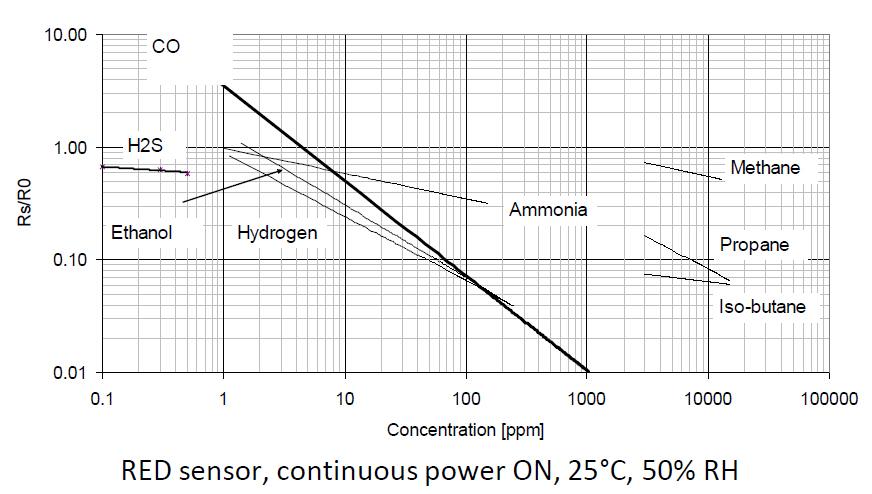
Performance RED sensor
| Characteristic RED sensor | Symbol | Typ | Min | Max | Unit |
|---|---|---|---|---|---|
| Sensing resistance in air | R0 | - | 100 | 1500 | kΩ |
| Typical CO detection range | FS | - | 1 | 1000 | ppm |
| Sensitivity factor | SR | - | 1.2 | 50 | - |
Performance OX sensor
| Characteristic OX sensor | Symbol | Typ | Min | Max | Unit |
|---|---|---|---|---|---|
| Sensing resistance in air | R0 | - | 0.8 | 20 | kΩ |
| Typical NO2 detection range | FS | - | 0.05 | 10 | ppm |
| Sensitivity factor | SR | - | 2 | - | - |

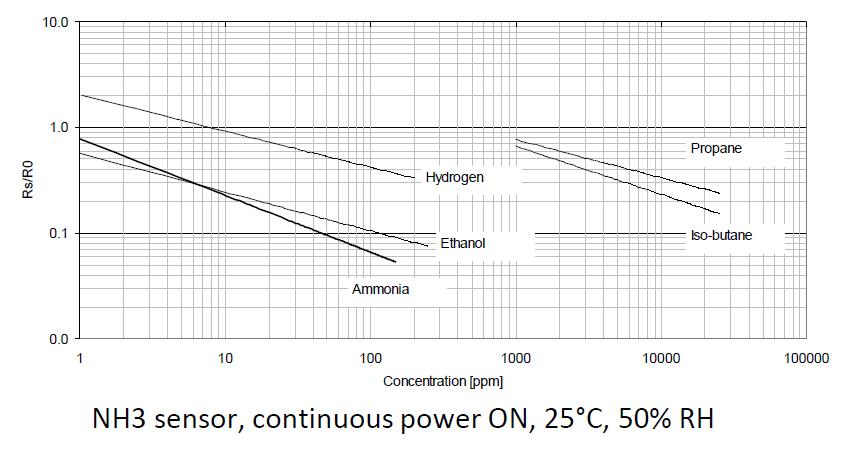
Performance NH3 sensor
| Characteristic NH3 sensor | Symbol | Typ | Min | Max | Unit |
|---|---|---|---|---|---|
| Sensing resistance in air | R0 | - | 10 | 1500 | kΩ |
| Typical NH3 detection range | FS | - | 1 | 300 | ppm |
| Sensitivity factor | SR | - | 1.5 | 15 | - |
Getting Started
Warning
Then sensor need to preheat at least 10 minutes before getting a stable data.
Hardware Installation:
1.Connect Grove - Multichannel Gas Sensor to Seeeduino.
Upload Code:
2.Download Arduino Library & Grove/Xadow firmware and install it to Arduino Library.
3.Open the code directly by the path:File -> Example -> Mutichannel_Gas_Sensor-> ReadSensorValue_Grove.
The code of ReadSensorValue_Grove is given below.
// Read Data from Grove - Multichannel Gas Sensor
#include <Wire.h>
#include "MutichannelGasSensor.h"

void setup()
{
    Serial.begin(115200);  // start serial for output
    Serial.println("power on!");
    gas.begin(0x04);//the default I2C address of the slave is 0x04
    gas.powerOn();
    Serial.print("Firmware Version = ");
    Serial.println(gas.getVersion());
}

void loop()
{
    float c;

    c = gas.measure_NH3();
    Serial.print("The concentration of NH3 is ");
    if(c>=0) Serial.print(c);
    else Serial.print("invalid");
    Serial.println(" ppm");

    c = gas.measure_CO();
    Serial.print("The concentration of CO is ");
    if(c>=0) Serial.print(c);
    else Serial.print("invalid");
    Serial.println(" ppm");

    c = gas.measure_NO2();
    Serial.print("The concentration of NO2 is ");
    if(c>=0) Serial.print(c);
    else Serial.print("invalid");
    Serial.println(" ppm");

    c = gas.measure_C3H8();
    Serial.print("The concentration of C3H8 is ");
    if(c>=0) Serial.print(c);
    else Serial.print("invalid");
    Serial.println(" ppm");

    c = gas.measure_C4H10();
    Serial.print("The concentration of C4H10 is ");
    if(c>=0) Serial.print(c);
    else Serial.print("invalid");
    Serial.println(" ppm");

    c = gas.measure_CH4();
    Serial.print("The concentration of CH4 is ");
    if(c>=0) Serial.print(c);
    else Serial.print("invalid");
    Serial.println(" ppm");

    c = gas.measure_H2();
    Serial.print("The concentration of H2 is ");
    if(c>=0) Serial.print(c);
    else Serial.print("invalid");
    Serial.println(" ppm");

    c = gas.measure_C2H5OH();
    Serial.print("The concentration of C2H5OH is ");
    if(c>=0) Serial.print(c);
    else Serial.print("invalid");
    Serial.println(" ppm");

    delay(1000);
}
4.Upload the code. Remember to select Seeeduino Uno from the Tools | Board menu of the Arduino environment, and select the correct serial port Arduino is using.
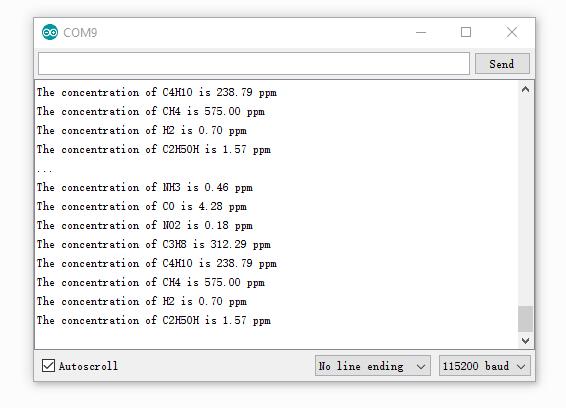
By opening the serial monitor, you can see the raw data read from sensor.
Tip
More details about Grove modules please refer to Grove System
Update Firmware
This grove module has an ATmega168 MCU which is flashed with a factory firmware. The version had been updated to V2 at Nov11/2016. Upload below code to detect the versin of your sensor.
// Get firmware version of Grove Multichannel Gas Sensor
#include <Wire.h>
#include "MutichannelGasSensor.h"

#define SENSOR_ADDR     0X04        // default to 0x04

void setup()
{
    Serial.begin(115200);
    gas.begin(SENSOR_ADDR);

    unsigned char version = gas.getVersion();
    Serial.print("Version = ");
    Serial.println(version);
}

void loop()
{
    // nothing to do
}
If the version of your sensor is V1, we advise you to upgrade it to V2 to get a better performance.
To update the firmware, you need,
- An Arduino UNO/Seeeduino V3/
- 6 dupont wire
- Soldering Iron
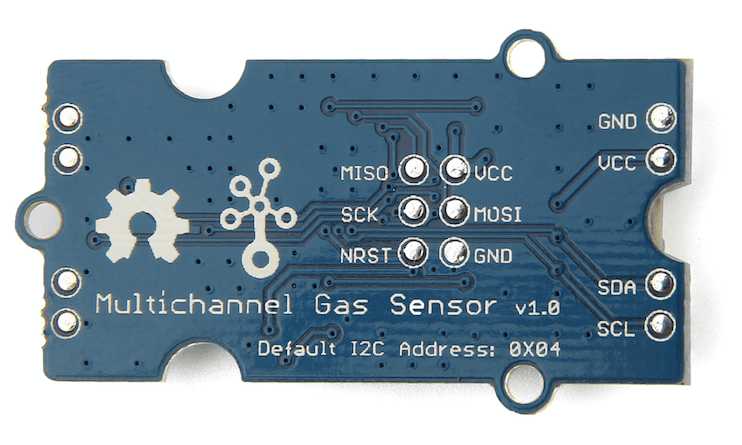
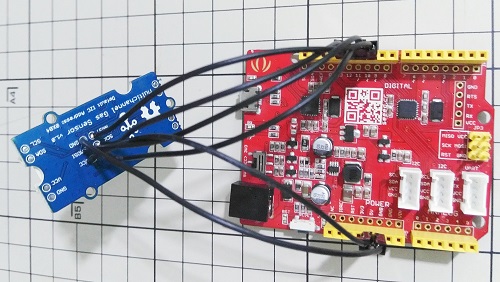
There’s a ICSP pad on the back of the board, you need connect those pads to an Arduino board.
| Sensor | Arduino |
|---|---|
| MISO | D12 |
| SCK | D13 |
| NRST | D10 |
| GND | GND |
| MOSI | D11 |
| VCC | 5V |
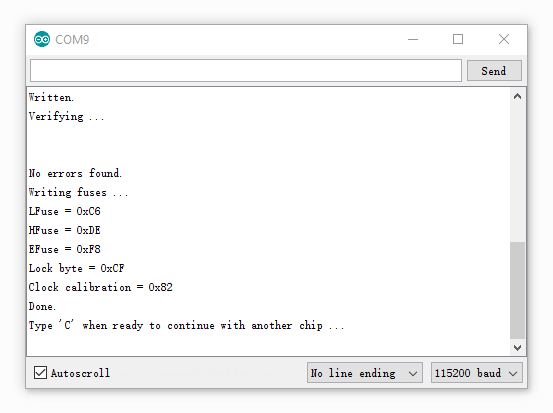
Then open the example UpdateFrimware to your Arduino, open Serial monitor and you will get some info printed. Input a ‘g’ to start.
calibration
If you always get an unauthentic value, please try to calibrate the sensor. Open the example calibration and upload to your Arduino, open Serial monitor to get info when it’s calibrating.
Note
The calibration has been done before the modules leave the factory. If you want to recalibrate, please do make sure that the air condition is fresh. And the calibration may need munutes to half an hour.
Resources
- Grove - Multichannel Gas Sensor v1.0 sch
- Grove - Multichannel Gas Sensor eagle files
- Arduino Library & Grove/Xadow firmware
- MiCS-6814 Datasheet
FAQ
-
Q1. How to change I2C address of the module
- A1. Open the I2C_Address example and run it.
-
Q2. I change the I2C address and unlucky that I forget what is it.
- A2. Don’t worry about it, run factory_setting example to make it default. Please note that the calibration data will factory setting as well.
Tip
If you need futhur support, please feel free to contact techsupport@seeed.cc
| Arduino | Wio | BeagleBone | Raspberry Pi | LinkIt ONE |
|---|---|---|---|---|
Caution
The platforms mentioned above as supported is/are an indication of the module's hardware or theoritical compatibility. We only provide software library or code examples for Arduino platform in most cases. It is not possible to provide software library / demo code for all possible MCU platforms. Hence, users have to write their own software library.
Help us make it better
Welcome to the new documentation system of Seeed Studio. We have made a lot of progress comparing to the old wiki system and will continue to improve it to make it more user friendly and helpful. The improvement can't be done without your kindly feedback. If you have any suggestions or findings, you are most welcome to submit the amended version as our contributor via Github or give us suggestions in the survey below, it would be more appreciated if you could leave your email so that we can reply to you. Happy Hacking!