Grove - Gas Sensor(MQ2)
Introduction
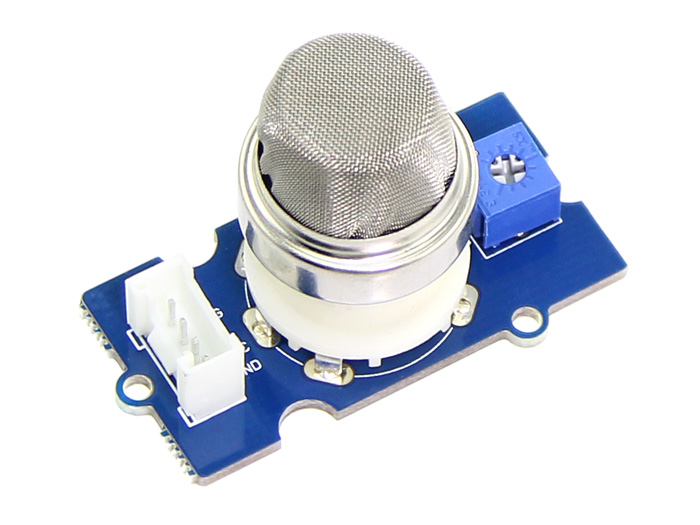
The Grove - Gas Sensor(MQ2) module is useful for gas leakage detection (home and industry). It is suitable for detecting H2, LPG, CH4, CO, Alcohol, Smoke or Propane. Due to its high sensitivity and fast response time, measurement can be taken as soon as possible. The sensitivity of the sensor can be adjusted by potentiometer.
Note
The sensor value only reflects the approximated trend of gas concentration in a permissible error range, it DOES NOT represent the exact gas concentration. The detection of certain components in the air usually requires a more precise and costly instrument, which cannot be done with a single gas sensor. If your project is aimed at obtaining the gas concentration at a very precise level, then we don’t recommend this gas sensor.
There are 4 kinds of gas sensors, every can detect different type of gas, here we use a table to illustrate.
| Sensor | Gas Type | Get One Now |
|---|---|---|
| MQ2 | Combustible Gas, Smoke |  |
| MQ3 | Alcohol Vapor | |
| MQ5 | LPG, Natural Gas, Town Gas | |
| MQ9 | Carbon Monoxide, Coal Gas, Liquefied Gas | |
Features
- Wide detecting scope
- Stable and long lifetime
- Fast response and High sensitivity
Tip
More details about Grove modules please refer to Grove System
Specification
| Item | Parameter | Min | Typical | Max | Unit |
|---|---|---|---|---|---|
| VCC | Working Voltage | 4.9 | 5 | 5.1 | V |
| PH | Heating consumption | 0.5 | - | 800 | mW |
| RL | Load resistance | adjustable | |||
| RH | Heater resistance | - | 33 | - | Ω |
| Rs | Sensing Resistance | 3 | - | 30 | kΩ |
Platforms Supported
Application Ideas
- Gas leakage detection.
- Toys.
Hardware Overview
This is an Analog output sensor. It needs to be connected to any one Analog socket in Grove Base Shield. The examples used in this tutorial make uses of A0 analog pin. Connect this module to the A0 port of Base Shield.
It is possible to connect the Grove module to Arduino directly by using jumper wires, please refer to the connection in the table below:
| Arduino | Gas Sensor |
|---|---|
| 5V | VCC |
| GND | GND |
| NC | NC |
| Analog A0 | SIG |
The output voltage from the Gas sensor increases when the concentration of gas increases. Sensitivity can be adjusted by rotating the potentiometer. Please note that the best preheat time for the sensor is above 24 hours. For detail information about the MQ-2 sensor, please refer the data-sheet provided in Resources section.
Getting Started
What do we need
| Name | Function | Qty | Link |
|---|---|---|---|
| Base Shield V2 | Provide Grove connectors | 1 | link |
| Seeeduino V4.2 | Controller | 1 | link |
| Grove-Gas Sensor MQ2 | Sensor | 1 | link |
Connection
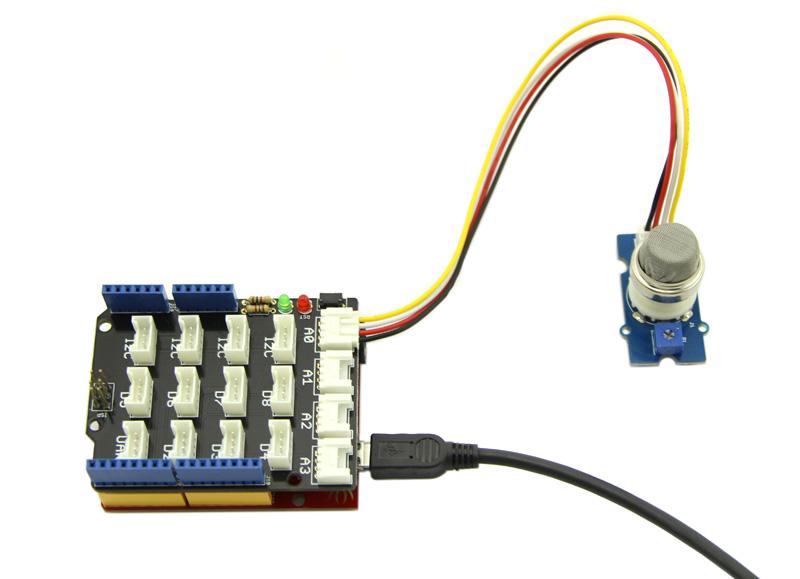
Connect the Grove - Gas Sensor(MQ2) to A0 port as shown in the picture above.
Gas Detection : Basic Example
In this example, the sensor is connected to A0 pin. The voltage read from the sensor is displayed. This value can be used as a threshold to detect any increase/decrease in gas concentration.
void setup() {
    Serial.begin(9600);
}

void loop() {
    float sensor_volt;
    float sensorValue;

    sensorValue = analogRead(A0);
    sensor_volt = sensorValue/1024*5.0;

    Serial.print("sensor_volt = ");
    Serial.print(sensor_volt);
    Serial.println("V");
    delay(1000);
}
Measurement : Approximation
These examples demonstrate ways to know the approximate concentration of Gas. As per the data-sheet of the MQx sensors, these equations are tested for standard conditions and are not calibrated. It may vary based on change in temperature or humidity.
- Keep the Gas Sensor in clean air environment. Upload the program below.
void setup() {
    Serial.begin(9600);
}

void loop() {
    float sensor_volt;
    float RS_air; //  Get the value of RS via in a clear air
    float R0;  // Get the value of R0 via in H2
    float sensorValue;

    /*--- Get a average data by testing 100 times ---*/
    for(int x = 0 ; x < 100 ; x++)
    {
        sensorValue = sensorValue + analogRead(A0);
    }
    sensorValue = sensorValue/100.0;
    /*-----------------------------------------------*/

    sensor_volt = sensorValue/1024*5.0;
    RS_air = (5.0-sensor_volt)/sensor_volt; // omit *RL
    R0 = RS_air/9.8; // The ratio of RS/R0 is 9.8 in a clear air from Graph (Found using WebPlotDigitizer)

    Serial.print("sensor_volt = ");
    Serial.print(sensor_volt);
    Serial.println("V");

    Serial.print("R0 = ");
    Serial.println(R0);
    delay(1000);

}
-
Then, open the serial monitor of Arduino IDE. Write down the value of R0 and this will be used in the next program. Please write down the R0 after the reading stabilizes.
Replace the R0 below with value of R0 tested above . Expose the sensor to any one of the gas listed above.
void setup() {
    Serial.begin(9600);
}

void loop() {

    float sensor_volt;
    float RS_gas; // Get value of RS in a GAS
    float ratio; // Get ratio RS_GAS/RS_air
    int sensorValue = analogRead(A0);
    sensor_volt=(float)sensorValue/1024*5.0;
    RS_gas = (5.0-sensor_volt)/sensor_volt; // omit *RL

          /*-Replace the name "R0" with the value of R0 in the demo of First Test -*/
    ratio = RS_gas/R0;  // ratio = RS/R0
          /*-----------------------------------------------------------------------*/

    Serial.print("sensor_volt = ");
    Serial.println(sensor_volt);
    Serial.print("RS_ratio = ");
    Serial.println(RS_gas);
    Serial.print("Rs/R0 = ");
    Serial.println(ratio);

    Serial.print("\n\n");

    delay(1000);

}
Now, we can get the concentration of gas from the figure below.
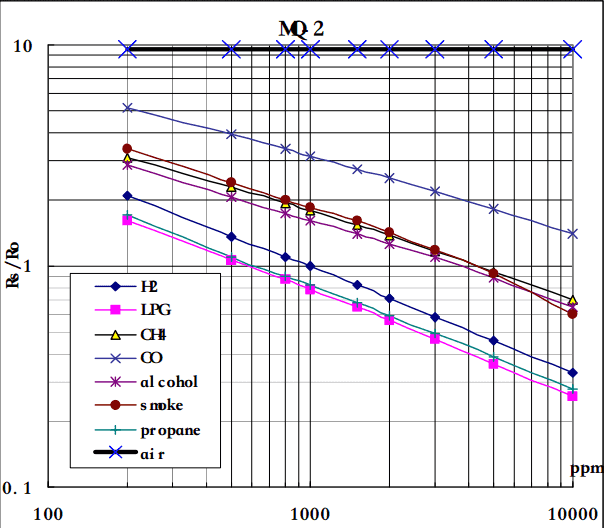
According to the graph, we can see that the minimum concentration we can test is 100ppm and the maximum is 10000ppm, in a other word, we can get a concentration of gas between 0.01% and 1%. However, we can’t provide a formula because the relation between ratio and concentration is nonlinear.
Resources
Suggest Reading / References
Schematic
Datasheet
| Arduino | Wio | BeagleBone | Raspberry Pi | LinkIt ONE |
|---|---|---|---|---|
Caution
The platforms mentioned above as supported is/are an indication of the module's hardware or theoritical compatibility. We only provide software library or code examples for Arduino platform in most cases. It is not possible to provide software library / demo code for all possible MCU platforms. Hence, users have to write their own software library.
Help us make it better
Welcome to the new documentation system of Seeed Studio. We have made a lot of progress comparing to the old wiki system and will continue to improve it to make it more user friendly and helpful. The improvement can't be done without your kindly feedback. If you have any suggestions or findings, you are most welcome to submit the amended version as our contributor via Github or give us suggestions in the survey below, it would be more appreciated if you could leave your email so that we can reply to you. Happy Hacking!