Arch GPRS V2
Introduction
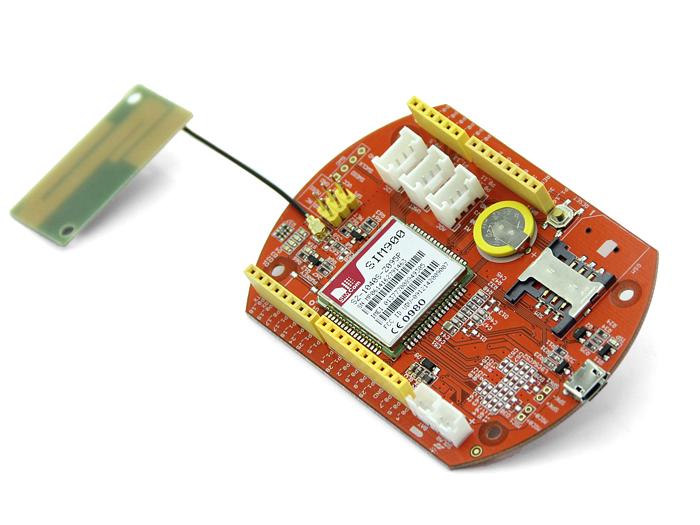
Arch GPRS V2 is the new and improved version of the Arch GPRS development board from Seeed Studio. Like the original Arch GPRS, it is also an mbed enabled development board that houses a cellular networking module along with a microcontroller. Arch GPRS V2 uses the LPC11U37 Microcontroller instead of the LPC11U24 used in the Arch GPRS. You can use the mbed C/C++ SDK, libraries and optimizing online development tools to rapidly build your Arch GPRS V2 based prototype. The cellular networking module on the Arch GPRS is based on the SIM900 Quad-band GSM/GRPS engine from SIMCom. With this, data collection functions can be performed easily using the 2G GSM/GPRS based cellular network. Arch GPRS V2 has a standard Arduino interface as well as Grove connectors on board. It is convenient to connect existing Shields and Grove products to Arch GPRS V2. You can even connect a solar panel directly to the board to allow the battery to charge from it. A low-power design guarantees easy charging and long hour operations when outdoors!

Note
Arch GPRS V2 does not come with an mbed interface. To output debug messages, please try USBSerial.Features
-
mbed enabled
- Online development tools
- Easy to use C/C++ SDK
- Lots of published libraries, projects
-
NXP LPC11U37 Controller
- Low power ARM Cortex-M0 Core
- On chip 128KB Flash, 12KB SRAM, 4KB EEPROM
- USB Device, UART, I2C
-
SIM900 Module
- Quad-band (850/900/1800/1900MHz) GSM/GPRS support
- Supports external SIM card: 1.8V/3V
- Control with standard AT Commands
-
Select automatically USB5V or Solar panel to charge a battery
Arch GPRS V2 vs Arch GPRS
| Parameter | Arch GPRS V2 | Arch GPRS |
|---|---|---|
| MCU | LPC11U27 | LPC11U24 |
| GSM/GPRS Module | SIM900 | EG-10 |
| MicroSD Card | Yes | No |
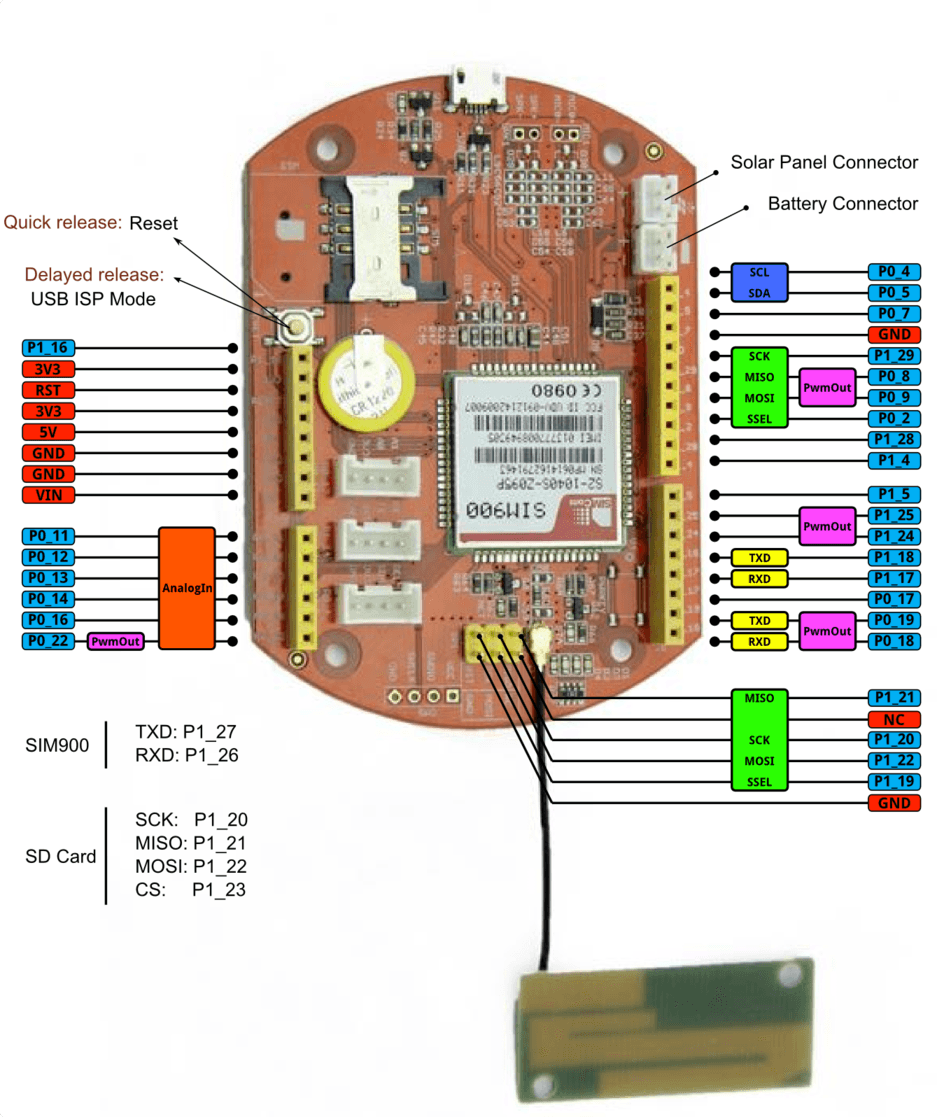
Hardware Overview
Getting Started
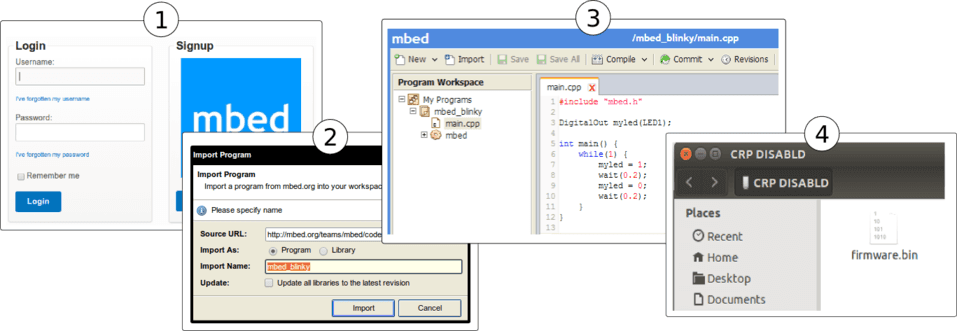
- Login into the mbed environment from here
- Import the mbed_blinky program
- Verify that the code imported in main.cpp in the mbed_blinky folder in the mbed online Compiler environment is as indicated in the figure above under Step 3. Ensure that the platform selected for compiling the code for is the Seeeduino-Arch. Now go ahead and compile the code. When asked to save the resultant binary file (.bin), save it to a designated folder on your PC.
- Now connect your Arch board to your PC and long press the reset button. A removable USB drive named CRP DISABLD should automatically appear on your PC. Go to the CRP DISABLD drive, delete the existing firmware file that you see in the folder and copy the downloaded binary file to CRP DISABLD. Quick press the reset button to run the new binary.
- Verify that your code is running successfully by looking at the Arch GPRS V2 board. If the right-most LED from the Pinout shown above is blinking and the other 3 LEDs next to it are all ON, this implies that your code is working.
You can change the code to the following and see what happens:
    #include "mbed.h"

    DigitalOut myled1(LED2); //left most LED if board is held as shown in Pinout diagram above
    DigitalOut myled2(LED3); //2nd from left
    DigitalOut myled3(LED4); //3rd from left
    DigitalOut myled4(LED1); //4th from left (right most)

    int main() {
        while(1) {

            myled1 = 1; //left most LED turns ON, rest off
            myled2 = 0;
            myled3 = 0;
            myled4 = 0;

            wait(1); //1 sec wait time
            myled1 = 0;
            myled2 = 1; //2nd from left LED turns ON, rest off
            myled3 = 0;
            myled4 = 0;

            wait(1);
            myled1 = 0;
            myled2 = 0;
            myled3 = 1; //3rd from left LED turns ON, rest off
            myled4 = 0;

            wait(1);
            myled1 = 0;
            myled2 = 0;
            myled3 = 0;
            myled4 = 1; //4th from left (right most) LED turns ON, rest off

            wait(1);
        }
    }
When you Compile and Run the above code on the Arch GPRS V2 board, you should see that the LEDs blink in sequence.
If you get through the above steps successfully, this means that:
- Your Arch GPRS V2 is powering up correctly.
- Your code is being downloaded and run by the Arch GPRS V2 module correctly.
- You are ready to take on more complex projects now!
Programming Arch on Windows, Linux or Mac
Arch does not have an mbed interface. It uses USB In-System-Programming (ISP) to upgrade the firmware.
To enter the USB ISP mode, connect the Arch with your computer and long press its button, and then a disk named “CRP DISABLD” will appear.
-
On windows
- delete firmware.bin in the “CRP DISABLD” disk.
- copy a new firmware into the disk.
-
On linux
- if the disk is not mounted, mount the disk at {mnt_dir}
- dd if={new_firmware.bin} of={mnt_dir}/firmware.bin conv=notrunc
-
On mac you’ll need to use Terminal to run the following script to copy you’re .bin file to your Arch
- dd if={new_firmare.bin} of=/Volumes/CRP\ DISABLD/firmware.bin conv=notrunc
If you are so inclined, you can also create an Automator application to support drag-and-drop of the file to your board. Just create a “Run Shell Script” with the following command:
dd if=$* of=/Volumes/CRP\ DISABLD/firmware.bin conv=notrunc
You will also need to change the "Pass Input" option from "to stdin" to "as arguments"–without this you will get an error "The action 'Run Shell Script' encountered an error" or "dd: no value specified for if (1)" in the log.
Also, an improved form of the script is: dd if=”${1}” of=/Volumes/CRP\ DISABLD/firmware.bin conv=notrunc
Which should handle spaces in the file path and only uses the first file supplied. Quick press the button to run the new firmware.
Resources
Design Files
Applications and Library
- GPRS library
- Use Seeeduino Arch as a debug adapter to debug another Seeeduino Arch
- Sense environment
- Play with Grove RTC
- Play with Grove - Ultrasonic ranger
See also
Help us make it better
Welcome to the new documentation system of Seeed Studio. We have made a lot of progress comparing to the old wiki system and will continue to improve it to make it more user friendly and helpful. The improvement can't be done without your kindly feedback. If you have any suggestions or findings, you are most welcome to submit the amended version as our contributor via Github or give us suggestions in the survey below, it would be more appreciated if you could leave your email so that we can reply to you. Happy Hacking!