ReSpeaker 2-Mics Pi HAT
Introduction
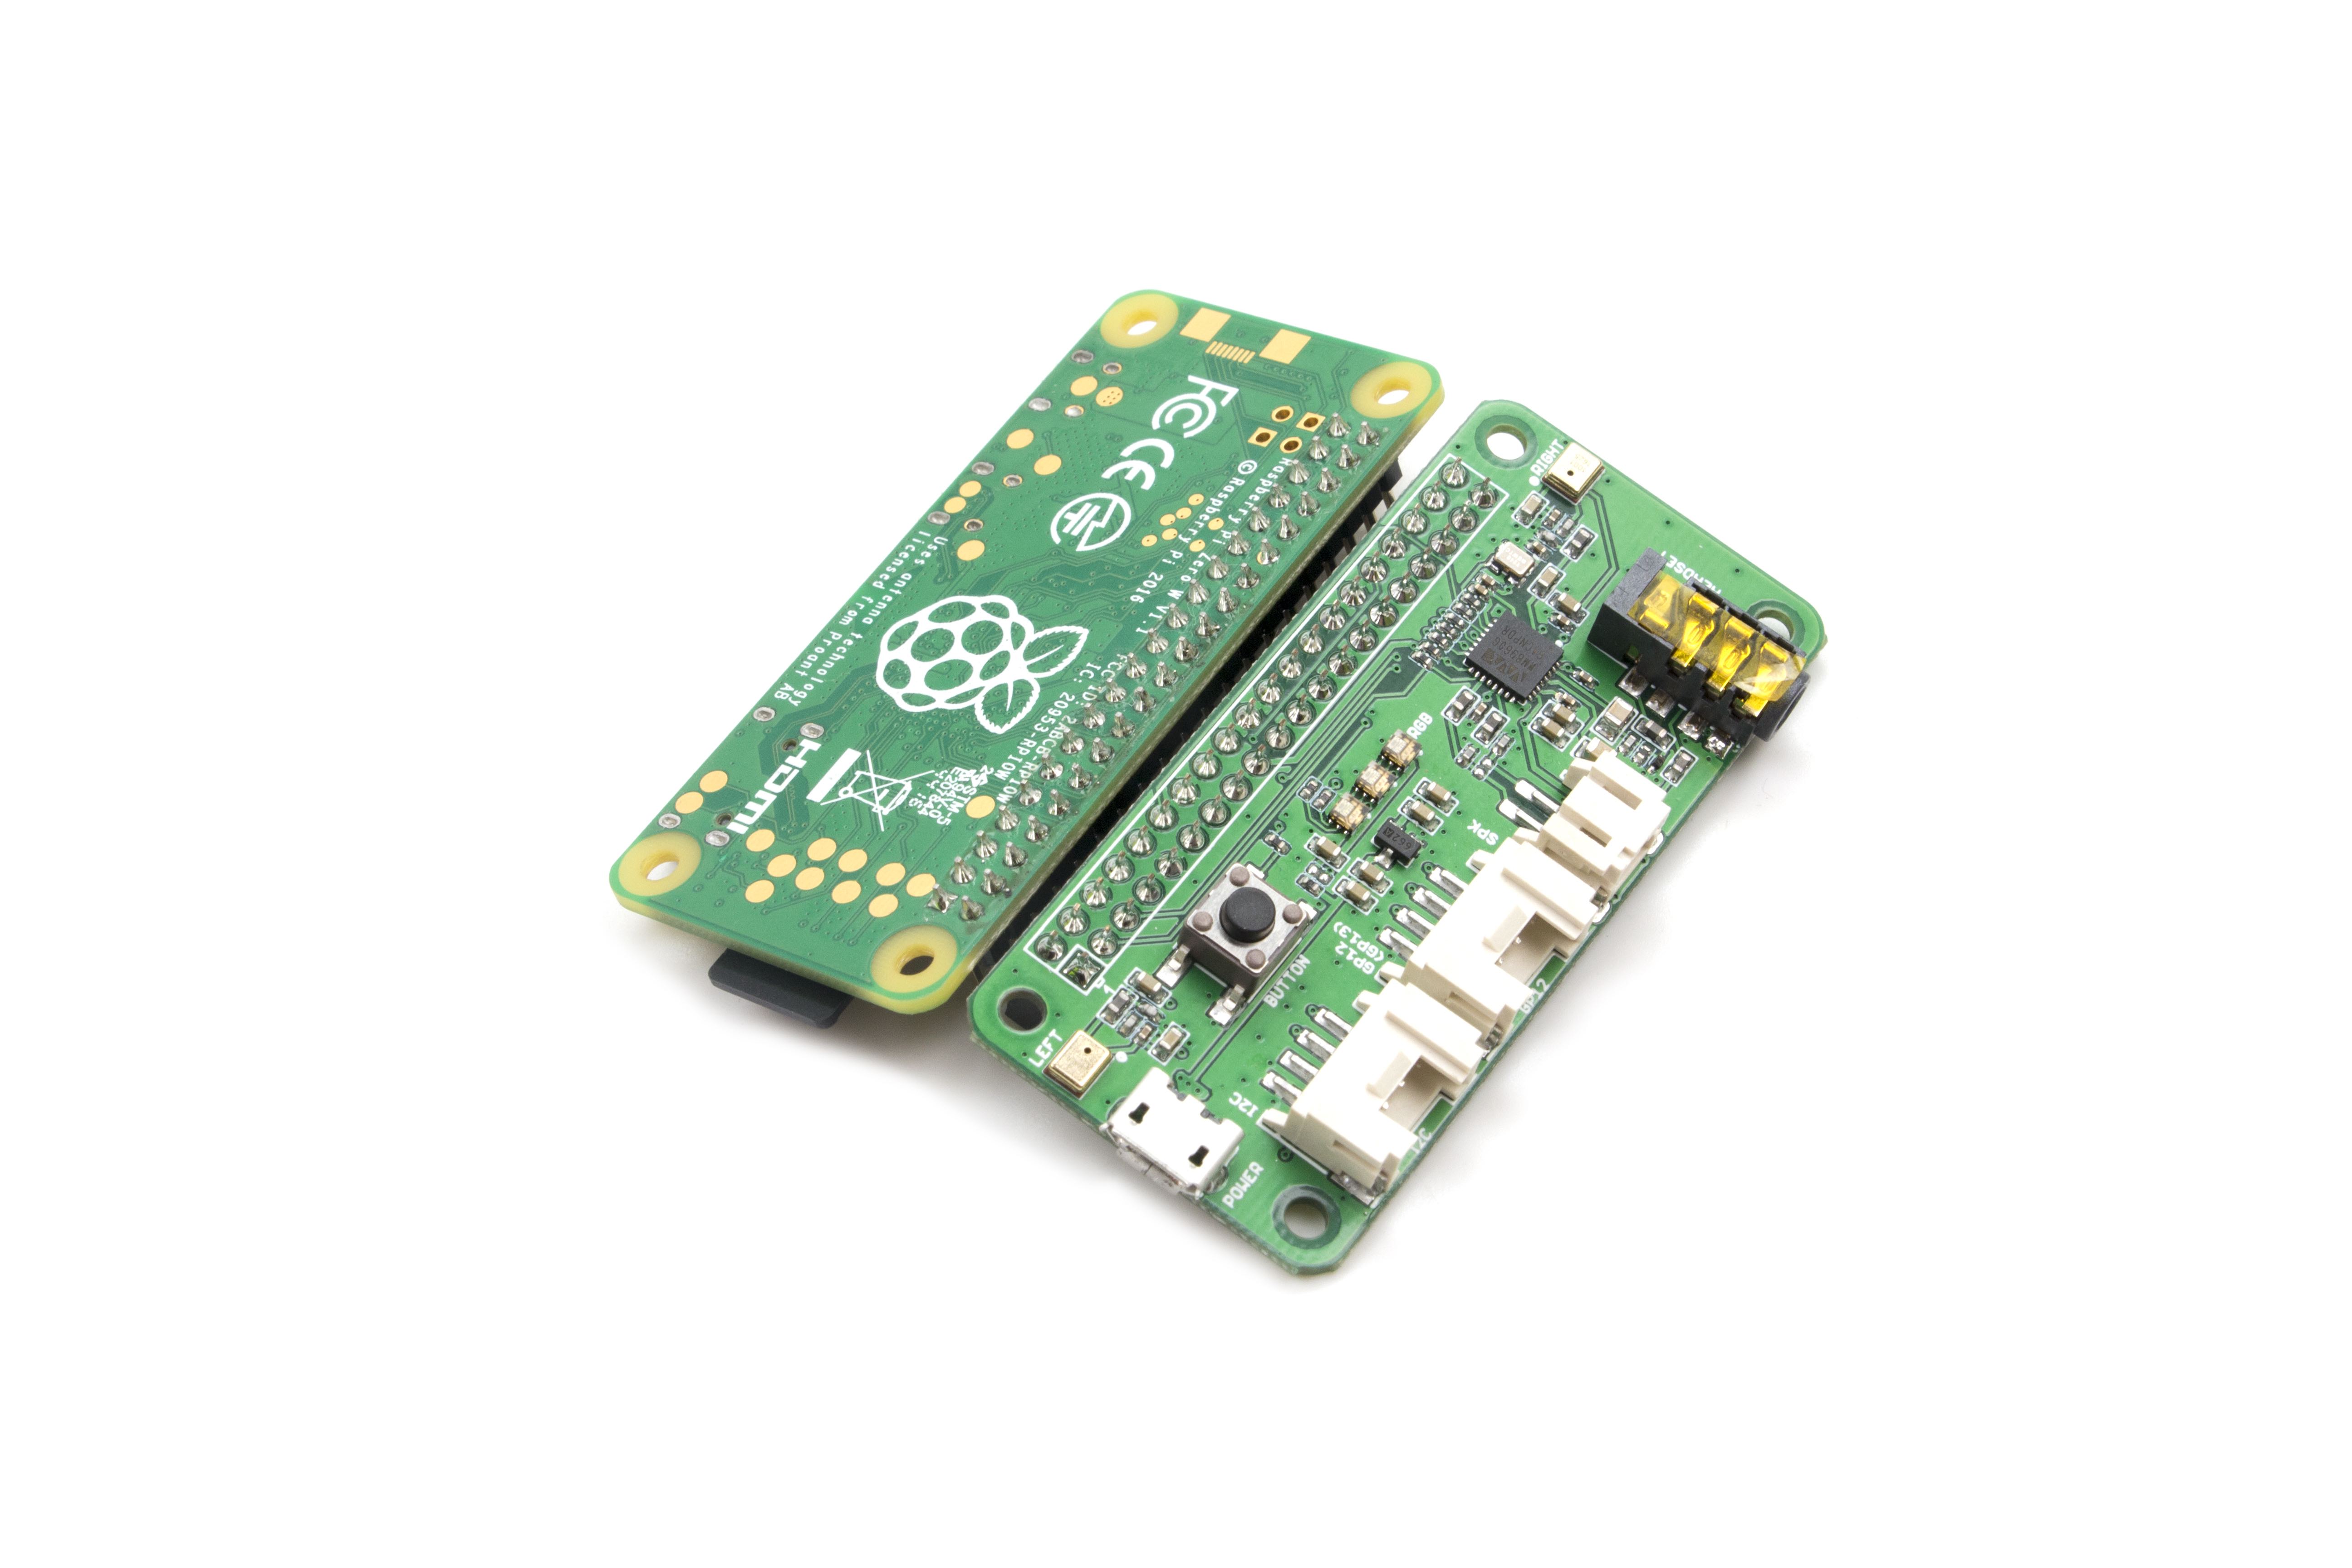
ReSpeaker 2-Mics Pi HAT is a dual-microphone expansion board for Raspberry Pi designed for AI and voice applications. This means that you can build a more powerful and flexible voice product that integrates Amazon Alexa Voice Service, Google Assistant, and so on.
The board is developed based on WM8960, a low power stereo codec. There are 2 microphones on both sides of the board for collecting sounds and it also provides 3 APA102 RGB LEDs, 1 User Button and 2 on-board Grove interfaces for expanding your applications. What is more, 3.5mm Audio Jack or JST 2.0 Speaker Out are both available for audio output.

Features
- Raspberry Pi compatible(Support Raspberry Pi Zero and Zero W, Raspberry Pi B+, Raspberry Pi 2 B and Raspberry Pi 3 B)
- 2 Microphones
- 2 Grove Interfaces
- 1 User Button
- 3.5mm Audio Jack
- JST2.0 Speaker Out
Application Ideas
- Voice Interaction Application
- AI Assistant
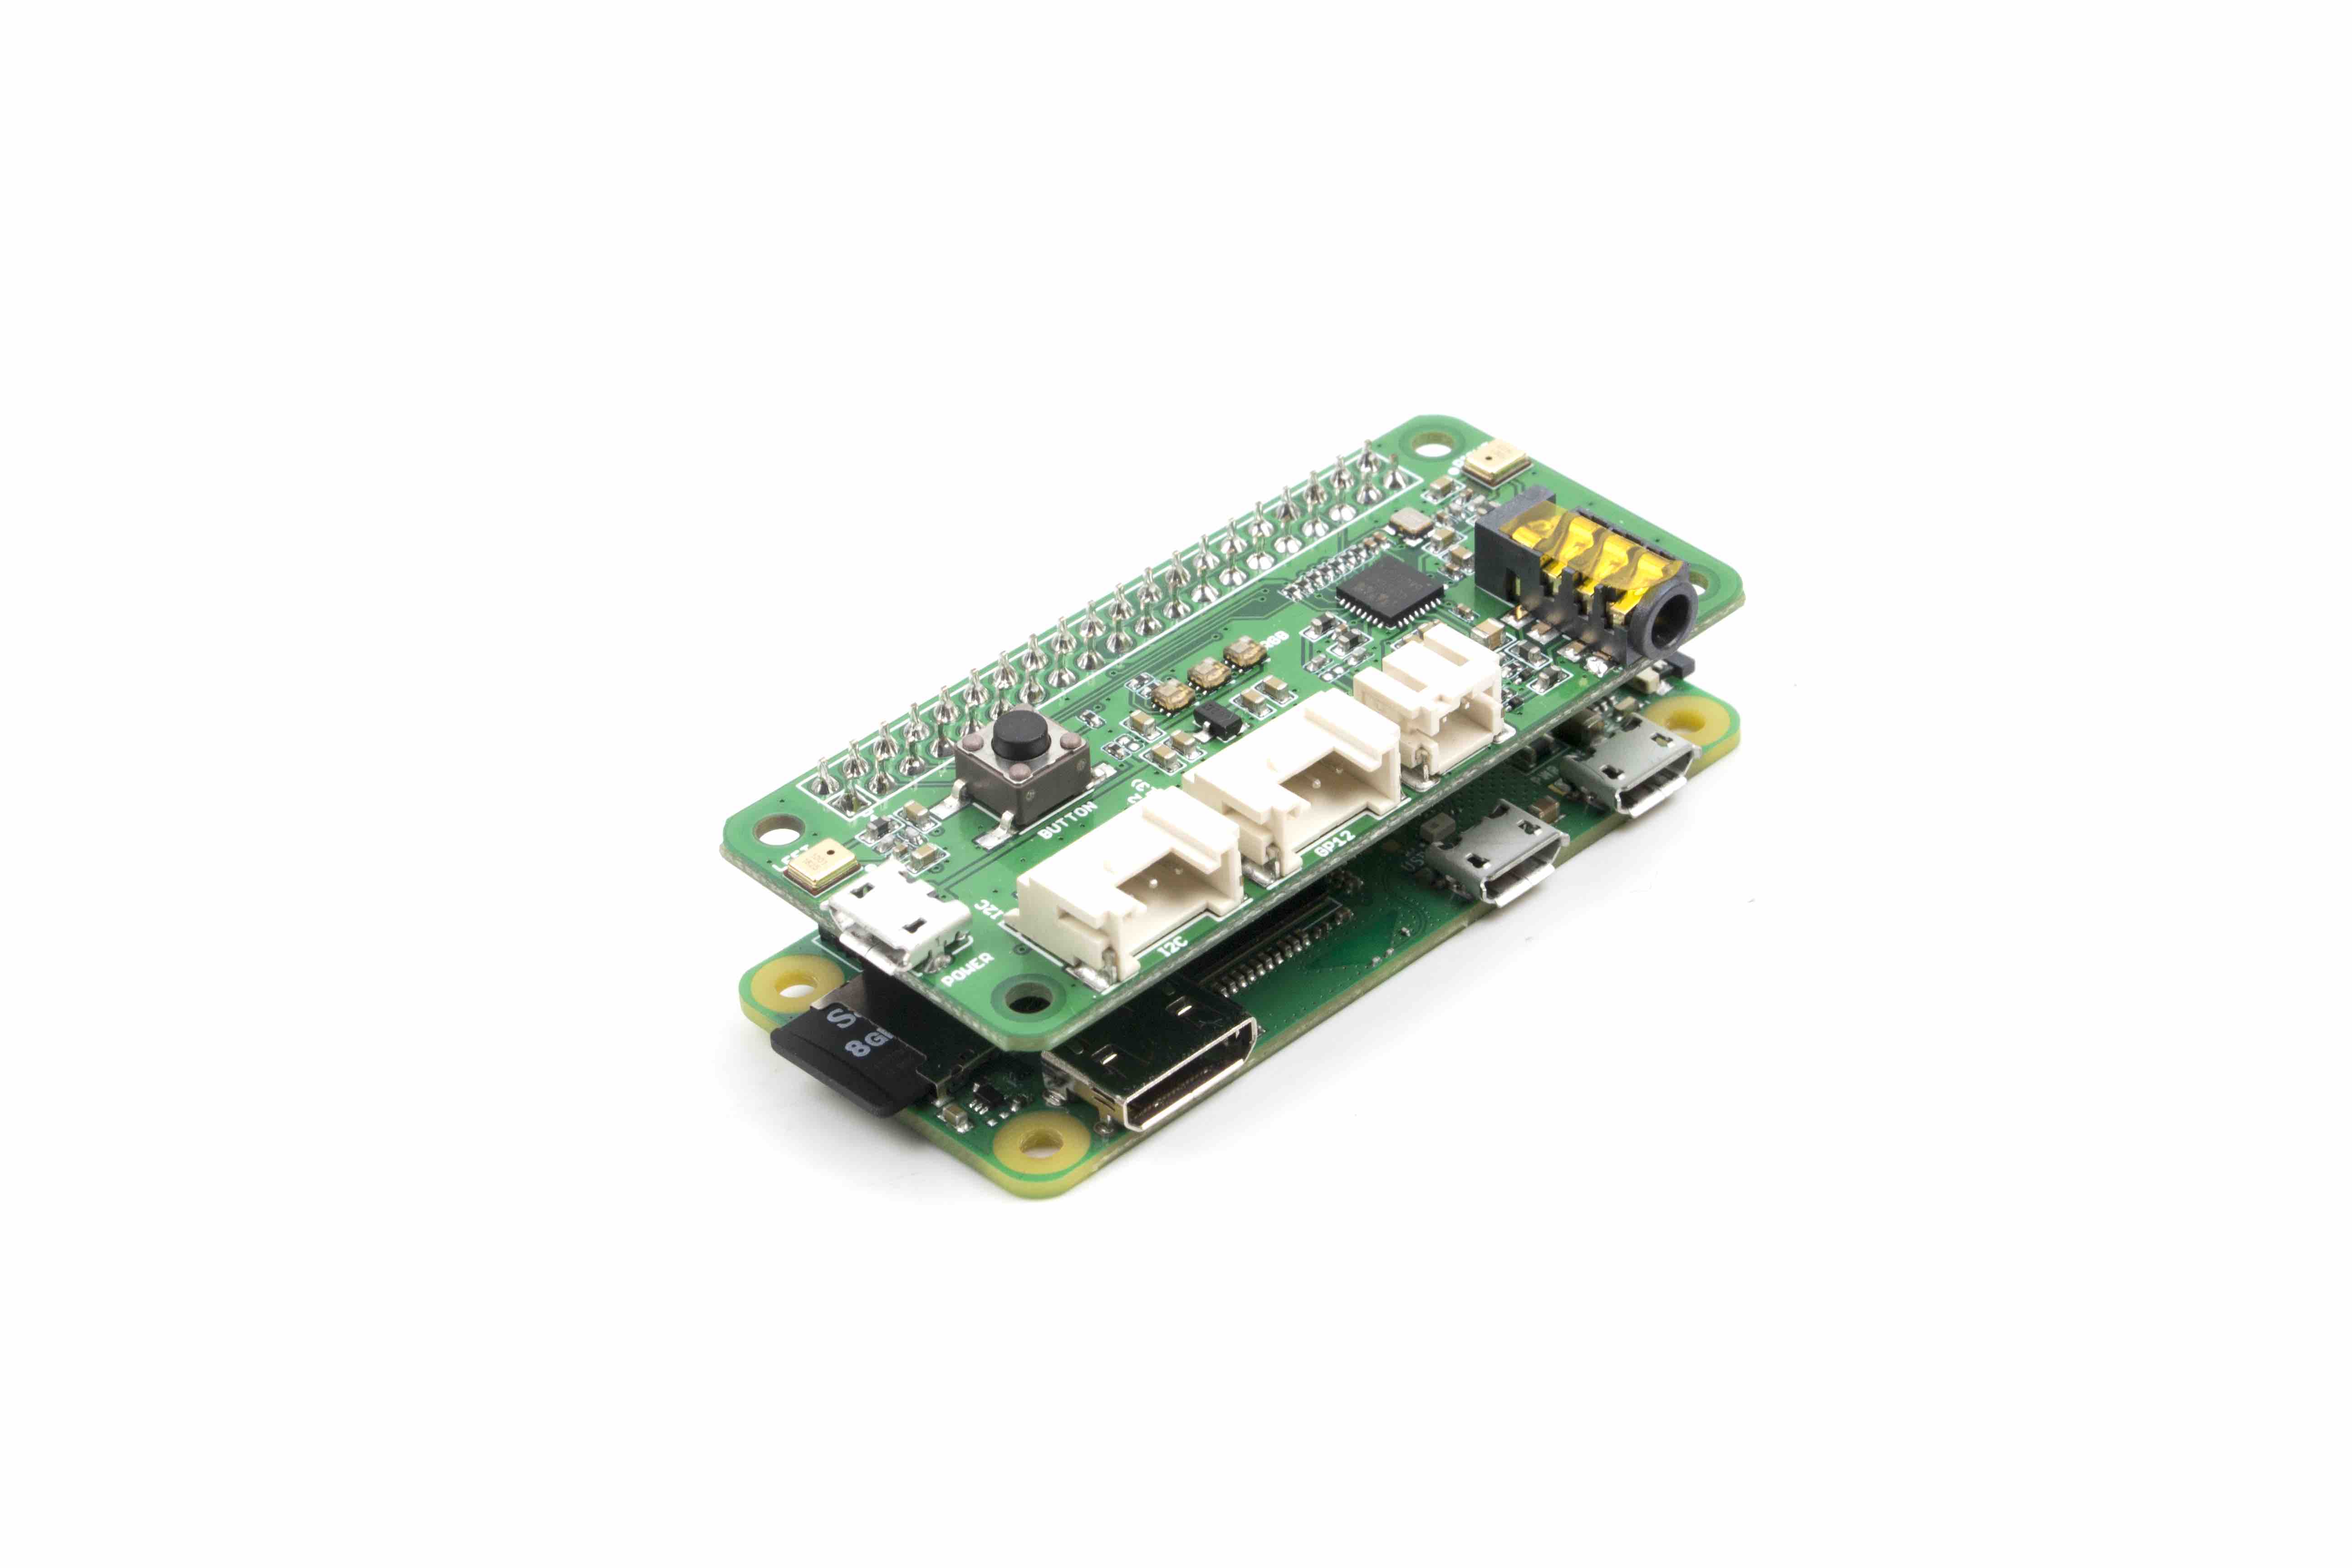
Hardware Overview

- BUTTON: a User Button, connected to GPIO17
- MIC_Land MIC_R: 2 Microphones on both sides of the board
- RGB LED: 3 APA102 RGB LEDs, connected to SPI interface
- WM8960: a low power stereo codec
- Raspberry Pi 40-Pin Headers: support Raspberry Pi Zero, Raspberry Pi 1 B+, Raspberry Pi 2 B and Raspberry Pi 3 B
- POWER: Micro USB port for powering the ReSpeaker 2-Mics Pi HAT, please power the board for providing enough current when using the speaker.
- I2C: Grove I2C port, connected to I2C-1
- GPIO12: Grove digital port, connected to GPIO12 & GPIO13
- JST 2.0 SPEAKER OUT: for connecting speaker with JST 2.0 connector
- 3.5mm AUDIO JACK: for connecting headphone or speaker with 3.5mm Audio Plug
Getting Started
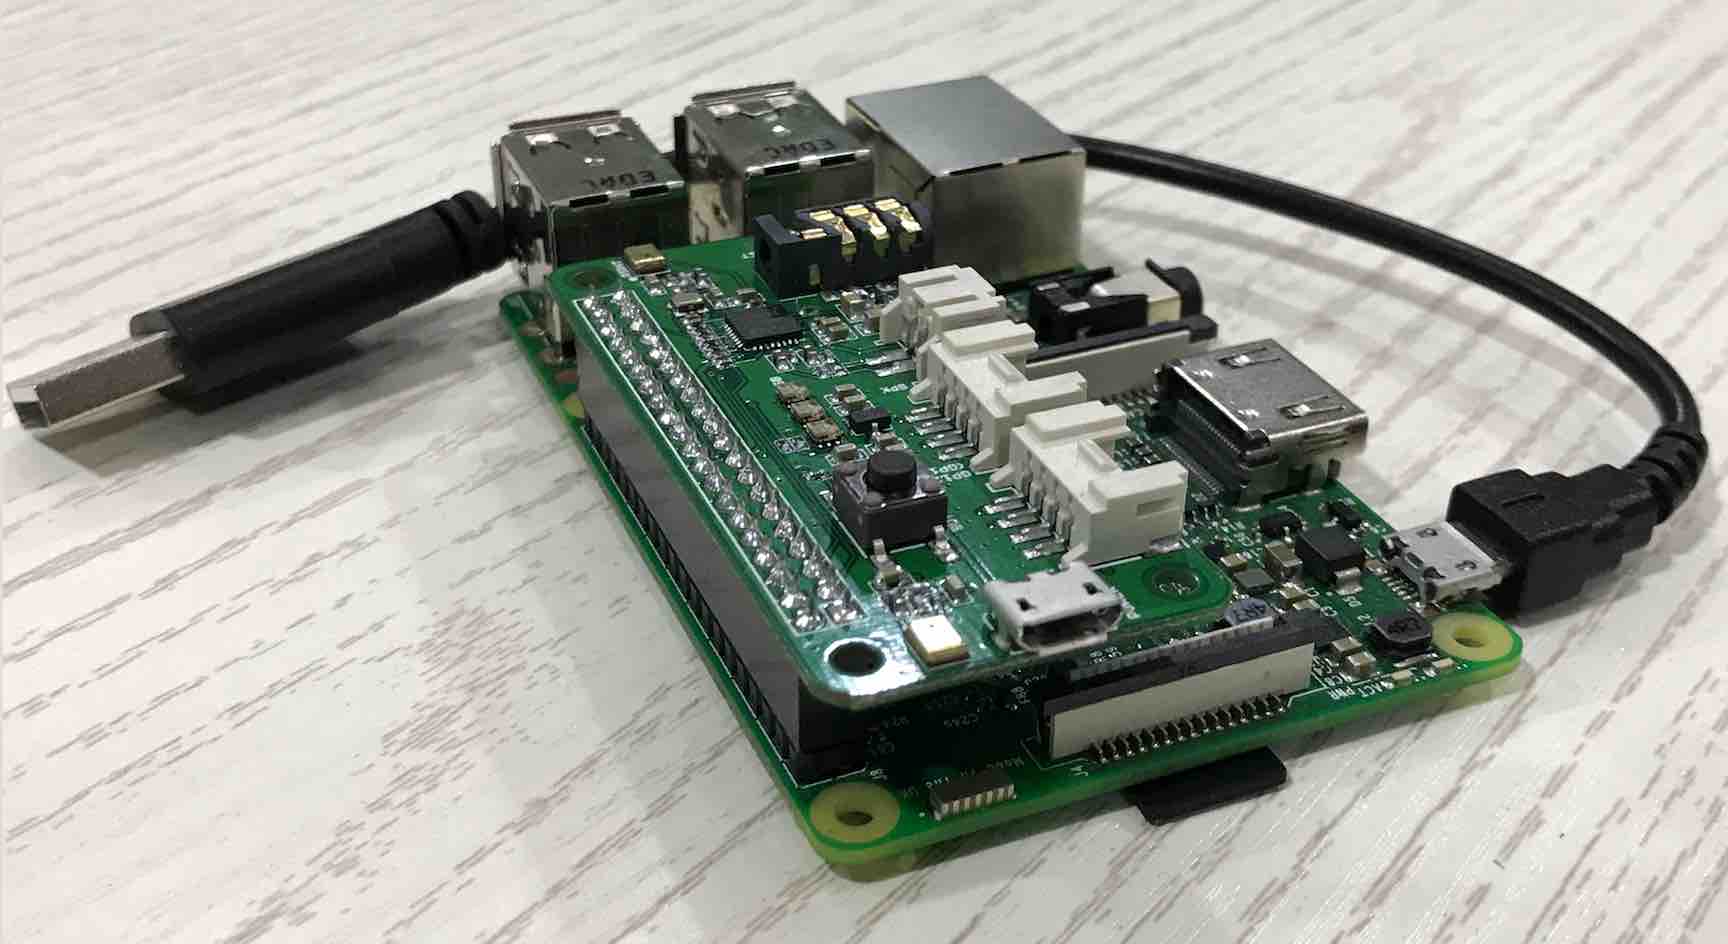
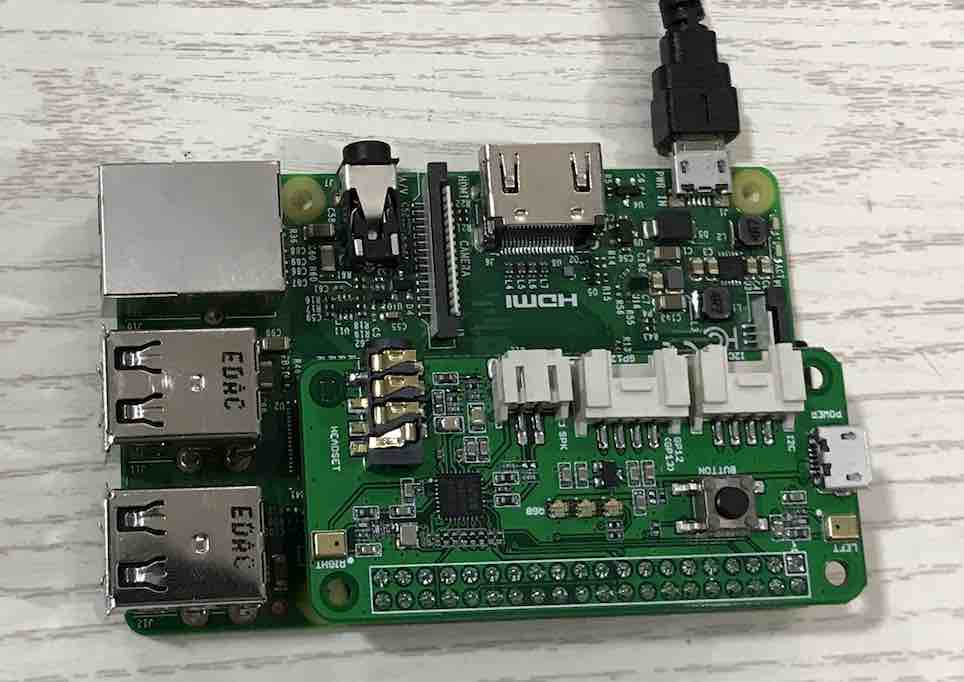
1. Connect ReSpeaker 2-Mics Pi HAT to Raspberry Pi
Mount ReSpeaker 2-Mics Pi HAT on your Raspberry Pi, make sure that the pins are properly aligned when stacking the ReSpeaker 2-Mics Pi HAT.
2. Setup the driver on Raspberry Pi
While the upstream wm8960 codec is not currently supported by current Pi kernel builds, upstream wm8960 has some bugs, we had fixed it. We must build it manually.
Make sure that you are running the lastest Raspbian Operating System(debian 9) on your Pi. (updated at 2017.09.15)
Then get the seeed voice card source code, install and reboot.
git clone https://github.com/respeaker/seeed-voicecard.git
cd seeed-voicecard
sudo ./install.sh 2mic
reboot
Check that the sound card name matches the source code seeed-voicecard.
pi@raspberrypi:~/seeed-voicecard $ aplay -l
**** List of PLAYBACK Hardware Devices ****
card 0: ALSA [bcm2835 ALSA], device 0: bcm2835 ALSA [bcm2835 ALSA]
  Subdevices: 8/8
  Subdevice #0: subdevice #0
  Subdevice #1: subdevice #1
  Subdevice #2: subdevice #2
  Subdevice #3: subdevice #3
  Subdevice #4: subdevice #4
  Subdevice #5: subdevice #5
  Subdevice #6: subdevice #6
  Subdevice #7: subdevice #7
card 0: ALSA [bcm2835 ALSA], device 1: bcm2835 ALSA [bcm2835 IEC958/HDMI]
  Subdevices: 1/1
  Subdevice #0: subdevice #0
card 1: seeed2micvoicec [seeed-2mic-voicecard], device 0: bcm2835-i2s-wm8960-hifi wm8960-hifi-0 []
  Subdevices: 1/1
  Subdevice #0: subdevice #0
pi@raspberrypi:~/seeed-voicecard $ arecord -l
**** List of CAPTURE Hardware Devices ****
card 1: seeed2micvoicec [seeed-2mic-voicecard], device 0: bcm2835-i2s-wm8960-hifi wm8960-hifi-0 []
  Subdevices: 1/1
  Subdevice #0: subdevice #0
pi@raspberrypi:~/seeed-voicecard $
Test, you will hear what you say to the microphones(don’t forget to plug in an earphone or a speaker):
arecord -f cd -Dhw:1 | aplay -Dhw:1
Enjoy!
3. Configure sound settings and adjust the volume with alsamixer
alsamixer is a graphical mixer program for the Advanced Linux Sound Architecture (ALSA) that is used to configure sound settings and adjust the volume.
pi@raspberrypi:~ $ alsamixer

The Left and right arrow keys are used to select the channel or device and the Up and Down Arrows control the volume for the currently selected device. Quit the program with ALT+Q, or by hitting the Esc key. More information
Note
Please use the F6 to select seeed-2mic-voicecard device first.
Getting started with Google Assistant
To get started with Google Assistant(what is Google Assistant), the first is that you should integrate the Google Assistant Library into your raspberry pi system. Here is the link to Google official guidance.
And the following guide will also show you how to get started with Google Assistant.
1. Configure a Developer Project and get JSON file
Follow step 1. 2. 3. 4. in the [guide](https://developers.google.com/assistant/sdk/prototype/getting-started-pi-python/config-dev-project-and-account#config-dev-project) to configure a project on Google Cloud Platform and create an OAuth Client ID JSON file. Don't forget to copy the JSON file to your Raspberry Pi.
2. Use a Python virtual environment to isolate the SDK and its dependencies from the system Python packages.
sudo apt-get update
sudo apt-get install python3-dev python3-venv # Use python3.4-venv if the package cannot be found.
python3 -m venv env
env/bin/python -m pip install --upgrade pip setuptools
source env/bin/activate
3. Install google-assistant-library
The Google Assistant SDK package contains all the code required to get the Google Assistant running on the device, including the library and sample code. Use pip to install the latest version of the Python package in the virtual environment:
(env) $ python -m pip install --upgrade google-assistant-library
4. Authorize the Google Assistant SDK
Authorize the Google Assistant SDK sample to make Google Assistant queries for the given Google Account. Reference the JSON file you copied over to the device in Step 1.
pi@raspberrypi:~ $ google-oauthlib-tool --client-secrets /home/pi/client_secret_client-id.json --scope https://www.googleapis.com/auth/assistant-sdk-prototype --save --headless
/home/pi/client_secret_client-id.jsonshould be the path of your JSON file, your should modify the commmand above- After running the command, it should display as shown below. Copy the URL and paste it into a browser (this can be done on your development machine, or any other machine). After you approve, a code will appear in your browser, such as “4/XXXX”. Copy this and paste this code into the terminal.
Please go to this URL: https://...
Enter the authorization code:
- It should then display: OAuth credentials initialized.
- If instead it displays: InvalidGrantError then an invalid code was entered. Try again, taking care to copy and paste the entire code.
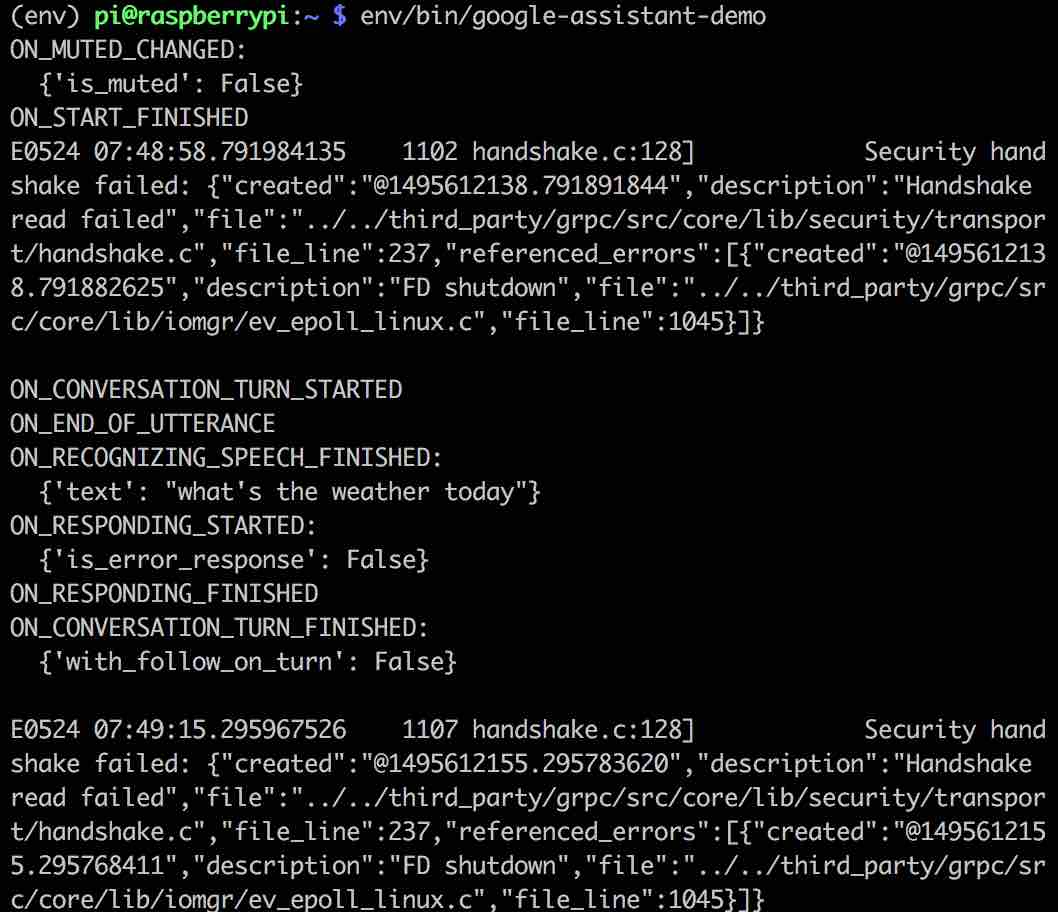
5. Start the Google Assistant demo
pi@raspberrypi:~ $ alsamixer    // To adjust the volume
pi@raspberrypi:~ $ source env/bin/activate
(env) pi@raspberrypi:~ $ env/bin/google-assistant-demo
6. Play with Google Assistant
Say Ok Google or Hey Google, followed by your query. The Assistant should respond. If the Assistant does not respond, follow the troubleshooting instructions.
7. Troubleshooting
See the Troubleshooting page if you run into issues.
How to use the on-board APA102 LEDs
Each on-board APA102 LED has an additional driver chip. The driver chip takes care of receiving the desired colour via its input lines, and then holding this colour until a new command is received.
- Activate SPI:
- sudo raspi-config
- Go to “Interfacing Options”
- Go to “SPI”; Enable SPI
- Exit the tool
- Reboot
- Get the APA102 Library and sample light programs:
cd ~/
git clone https://github.com/respeaker/mic_hat.git
sudo pip install spidev
cd mic_hat
python pixels.py
How to use User Button
There is an on-board User Button, which is connected to GPIO17. Now we will try to detect it with python and RPi.GPIO.
sudo pip install rpi.gpio    // install RPi.GPIO library
nano button.py               // copy the following code in button.py
import RPi.GPIO as GPIO
import time

BUTTON = 17

GPIO.setmode(GPIO.BCM)
GPIO.setup(BUTTON, GPIO.IN)

while True:
    state = GPIO.input(BUTTON)
    if state:
        print("off")
    else:
        print("on")
    time.sleep(1)
Save the code as button.py, then run it. It should display “on” when you press the button:
pi@raspberrypi:~ $ python button.py
off
off
on
on
off
User Button to trigger Google Assisant
There is an esay way to use a button(instead of speaking “ok google”) to trigger Google Assisant.
1. Modify pushtotalk.py
// when using our Raspbian image
cd /usr/local/lib/python2.7/dist-packages/googlesamples/assistant/grpc
sudo nano pushtotalk.py
Go to the buttom of the file(Line 301), then modify as the following code and save:
    with SampleAssistant(conversation_stream,
                         grpc_channel, grpc_deadline) as assistant:
        # If file arguments are supplied:
        # exit after the first turn of the conversation.
        if input_audio_file or output_audio_file:
            assistant.converse()
            return

        # If no file arguments supplied:
        # keep recording voice requests using the microphone
        # and playing back assistant response using the speaker.
        # When the once flag is set, don't wait for a trigger. Otherwise, wait.
        wait_for_user_trigger = not once
        import RPi.GPIO as GPIO
        GPIO.setmode(GPIO.BCM)
        GPIO.setup(17,GPIO.IN)
        while True:
            if wait_for_user_trigger:
                state = GPIO.input(17)
                logging.info('Press the button to send a new request...')
                if state:
                    continue
                else:
                    pass
               # click.pause(info='Press Enter to send a new request...')
            continue_conversation = assistant.converse()
            # wait for user trigger if there is no follow-up turn in
            # the conversation.
            wait_for_user_trigger = not continue_conversation

            # If we only want one conversation, break.
            if once and (not continue_conversation):
                break


if __name__ == '__main__':
    main()
2. Run the command to test:
$ googlesamples-assistant-pushtotalk
3. The demo will be displayed as below:

Raspbian image
As Raspbian Operating System is updated to Debian 9, we won’t provide our Raspbian image anymore. Click here to get the lastest Raspbian Operating System.
Resources
- [Eagle] Respeaker_2_Mics_Pi_HAT_SCH
- [Eagle] Respeaker_2_Mics_Pi_HAT_PCB
- [PDF] Respeaker_2_Mics_Pi_HAT_SCH
- [PDF] Respeaker_2_Mics_Pi_HAT_PCB
Help us make it better
Welcome to the new documentation system of Seeed Studio. We have made a lot of progress comparing to the old wiki system and will continue to improve it to make it more user friendly and helpful. The improvement can't be done without your kindly feedback. If you have any suggestions or findings, you are most welcome to submit the amended version as our contributor via Github or give us suggestions in the survey below, it would be more appreciated if you could leave your email so that we can reply to you. Happy Hacking!