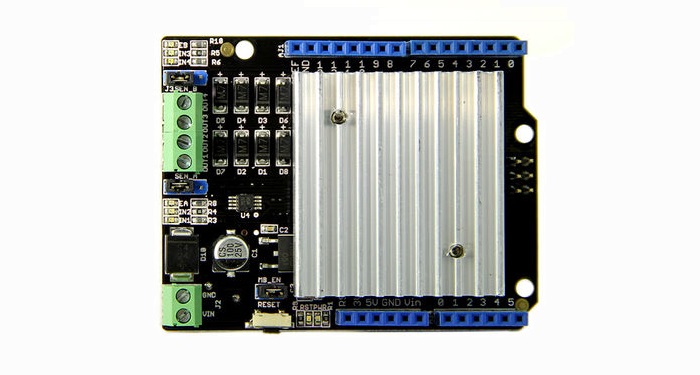
Motor Shield V2.0
Introduction
Note
This document works for Motor Shield V2.0/2.1/2.2.
The Motor Shield is a driver module for motors that allows you to use Arduino to control the working speed and direction of the motor. Based on the Dual Full-Bridge Drive Chip L298, it is able to drive two DC motors or a step motor. The Motor Shield can either be powered by Arduino directly or by an external 6V~15V power supply via the terminal input. This module can be used for the development of micro robots and intelligent vehicles, etc

Version
| Revision | Descriptions | Release |
|---|---|---|
| v1.0 | Initial public release | NA |
| v2.0 | Enable +5V Pin of Arduino/Seeeduino to power motor | 2013-2 |
Features
- Standard Arduino UNO Shield pin out
- Based on L298 full bridge IC
- Drive 2 DC Motor or 1 Stepper
- External power input available
- Led indicators
- Heat sink for better performance
- Arduino library
Specifications
| Spec | Value |
|---|---|
| Operating Voltage | 5V |
| External Power | 6-15V |
| Output Current | 2.0A Max @ Each Channel |
| PWM Range | 0-100% |
| Output | 2 Channels, 4 Ports |
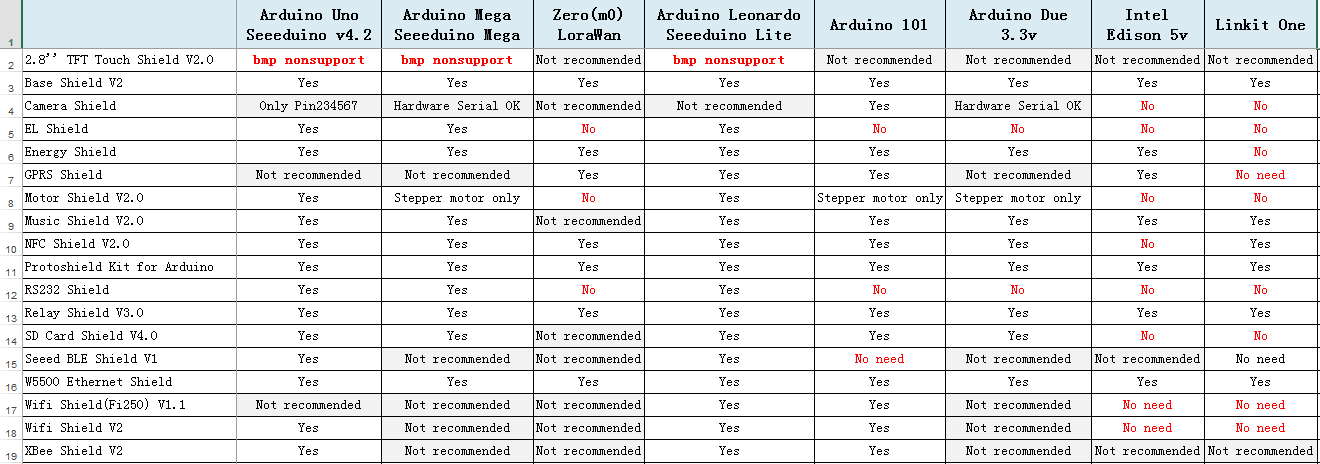
Platforms Supported
Compatibility
We have produced a lot of extension boards that can make your platform board more powerful, however not every extension board is compatible with all the platform boards, here we use a table to illustrate how are those boards compatible with platform board.
Note
Please note that “Not recommended” means that it might have chance to work with the platform board however requires extra work such as jump wires or rewriting the code. If you are interested in digging more, welcome to contact with techsupport@seeed.cc.
Click to see full picture
Hardware Overview
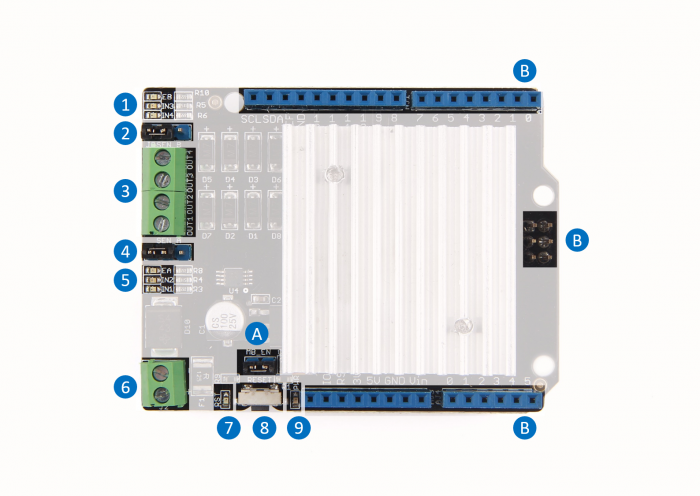
1.Channel 1 indicator, include 3 leds
- EB - channel 1 enable, high active
- IN3 - status of OUT3
- IN4 - status of OUT4
2.Channel 1 Sense - Please connect the left 2 pins together for normal usage.
Note that it’s a high level application for sense the current, please refer to datasheet and schematic for more information.
3.OUTPUT - There’re 2 channels, each channel has 2 output
- Channel 0 - OUT1, OUT2
- Channel 1 - OUT3, OUT4
4.Channel 0 Sense
5.Channel 0 indicator, include 3 leds
- EB - channel 0 enable, high active
- IN1 - status of OUT1
- IN2 - status of OUT2
6.External Power Input, range 6-15V
7.Reset indicator - turn red when Reset button is pressed
8.Reset button - pressed to reset the shield and Arduino
9.Power indicator - turn green when power in, either internal or external
A. Power switch
- Connect - Get power from Arduino
- Disconnect - Get power from External sources
B. Standard Arduino shield pin out
Digital Pin Used
| Arduino Pin | Function |
|---|---|
| D0 | Not Used |
| D1 | Not Used |
| D2 | Not Used |
| D3 | Not Used |
| D4 | Not Used |
| D5 | Not Used |
| D6 | Not Used |
| D7 | Not Used |
| D8 | OUT1 |
| D9 | Enable of Channel0 |
| D10 | Enable of Channel1 |
| D11 | OUT2 |
| D12 | OUT3 |
| D13 | OUT4 |
Note
D8~D13 are used by Motor Shield. Please don’t use those pins to avoid conflict.
Analog Pin Used
| Arduino Pin | Function |
|---|---|
| D0 | Not Used |
| D1 | Not Used |
| D2 | Not Used |
| D3 | Not Used |
| D4 | Not Used |
| D5 | Not Used |
Note
Not Used means you can use those pins freely.
Getting Started
Drive a DC motor
Connection
Here we will show you how this Motor Shield works via a simple demo. First of all, you need to prepare the below stuffs:
| Seeeduino V4 | DC Motor | Motor Shield |
|---|---|---|
 |
 |
 |
| Get ONE Now | Get ONE Now | Get ONE Now |
- Set SEN_A and SEN_B, connect the left 2 pins together with a jumper.
- Connect MB_EN together with a jumper, as we are not going use an external power.
- Connect DC motor to Chanel 0 (OUT1 and OUT2).
- Plug Motor Shield into Arduino.
- Connect Arduino to PC via a USB cable.

Software
- Click below button to download the motor shield library.
- Please follow how to install an arduino library procedures to install the library.

- Upload the code to Seeeduino V4.
//  Demo function:The application method to drive the DC motor.
//  Author:Loovee (luweicong@seeed.cc)
//  2016-3-11

#include "MotorDriver.h"

MotorDriver motor;

void setup()
{
    // initialize
    motor.begin();
}

void loop()
{
    motor.speed(0, 100);            // set motor0 to speed 100
    delay(1000);
    motor.brake(0);                 // brake
    delay(1000);
    motor.speed(0, -100);           // set motor0 to speed -100
    delay(1000);
    motor.stop(0);                  // stop
    delay(1000);
}
// END FILE
- Then you will find your motor move (1s), stop (1s), move back (1s), stop (1s), and loop.
If nothing happens, please make sure:
- We have uploaded the code successfully
- The motor is connected properly
- The led indicators blink right
Drive a Stepper
Connection
Here we will show you how this Motor Shield works via a simple demo. First of all, you need to prepare the below stuffs:
| Seeeduino V4 | Stepper Motor | Motor Shield |
|---|---|---|
|
 |
|
| Get ONE Now | Get ONE Now | Get ONE Now |
- Set SEN_A and SEN_B, connect the left 2 pins together with a jumper.
- Connect MB_EN together with a jumper, as we are not going use an external power.
- Find the pin definitions of you stepper, and connect it to the OUTPUT of the shield. As below:
| Stepper | Motor Shield |
|---|---|
| A+ | OUT1 |
| A- | OUT2 |
| B+ | OUT3 |
| B- | OUT4 |
- Plug Motor Shield into Arduino.
- Connect Arduino to PC via a USB cable.
Software
Copy below code to Arduino IDE and upload it to Seeeduino V4, then you will find your stepper move.
/*
 * Stepper test for Seeed Motor Shield V2
 * loovee @ 15 Mar, 2016
 */

#include <Stepper.h>

// change this to the number of steps on your motor
#define STEPS 200

// create an instance of the stepper class, specifying
// the number of steps of the motor and the pins it's
// attached to
Stepper stepper(STEPS, 8, 11, 12, 13);

// the previous reading from the analog input
int previous = 0;

void step(int steps)
{
    digitalWrite(9, HIGH);
    digitalWrite(10, HIGH);
    stepper.step(steps);
    digitalWrite(9, LOW);
    digitalWrite(10, LOW);
}

void setup()
{
    // set the speed of the motor to 30 RPMs
    pinMode(9, OUTPUT);
    pinMode(10, OUTPUT);
    digitalWrite(9, LOW);
    digitalWrite(10, LOW);
    stepper.setSpeed(30);
}

void loop()
{
    step(1000);
    step(-1000);
}

// END FILE
If nothing happens, please double check if you have connected the wire right.
Library APIs
DC Motor APIs:
begin
Description
void begin();
speed
Description
void move(int motor_id, int speed);
- motor_id
- 0 - Chanel 0
- 1 - Chanel 1
- speed: -100~100, the larger the faster, 0 for stop
stop
void stop(unsigned char motor_id);
brake
void brake(unsigned char motor_id);
Stepper
Note that we use the library provided by Arduino IDE to drive a stepper.
There’s something need to be modified, please refer to the examples.
Resources
- [Eagle] Motor Shield V2.0 Eagle File
- [Eagle] Motor shield V2.1 Eagle File
- [PDF] Motor Shield 2.0 schematics
- [PDF] Motor Shield 2.1 schematics
- [PDF] Motor Shield 2.2 schematics
- [Library] Motor Shield Library
- [Datasheet] L298 Datasheet
- [Datasheet] 78M05 Datasheet
| Arduino | Wio | BeagleBone | Raspberry Pi | LinkIt ONE |
|---|---|---|---|---|
Caution
The platforms mentioned above as supported is/are an indication of the module's hardware or theoritical compatibility. We only provide software library or code examples for Arduino platform in most cases. It is not possible to provide software library / demo code for all possible MCU platforms. Hence, users have to write their own software library.
Help us make it better
Welcome to the new documentation system of Seeed Studio. We have made a lot of progress comparing to the old wiki system and will continue to improve it to make it more user friendly and helpful. The improvement can't be done without your kindly feedback. If you have any suggestions or findings, you are most welcome to submit the amended version as our contributor via Github or give us suggestions in the survey below, it would be more appreciated if you could leave your email so that we can reply to you. Happy Hacking!