Grove - Thumb Joystick
Introduction

Grove - Thumb Joystick is a Grove compatible module which is very similar to the ‘analog’ joystick on PS2 (PlayStation 2) controllers. The X and Y axes are two ~10k potentiometers which control 2D movement by generating analog signals. The joystick also has a push button that could be used for special applications. When the module is in working mode, it will output two analog values, representing two directions. Compared to a normal joystick, its output values are restricted to a smaller range (i.e. 200~800), only when being pressed that the X value will be set to 1023 and the MCU can detect the action of pressing.

Features
- Grove Interface
- 5V/3.3V Compatible
- Analog Output
Tip
More details about Grove modules please refer to Grove System
Application Ideas
- Game Controller
- Robot remote control
Project - 2048 Game
This is a Pi game project which is consists of Grove - Thumb Joystick. Click on the images below to get more information about this project.

Specifications
| Item | Min | Typical | Max | Unit |
|---|---|---|---|---|
| Working Voltage | 4.75 | 5.0 | 5.25 | V |
| Output Analog Value (X coordinate) | 206 | 516 | 798 | \ |
| Output Analog Value (Y coordinate) | 203 | 507 | 797 | \ |
Platforms Supported
Usage
With Arduino
The Grove - Thumb Joystick is an analog device that outputs analog signal ranging from 0 to 1023. That requires us to use the analog port of Arduino to take the readings.
1.Connect the module to the A0/A1 of Grove - Base Shield by using the 4-pin grove cable.
2.Plug the Grove - Basic Shield into Arduino.
3.Connect Arduino to PC by using a USB cable.
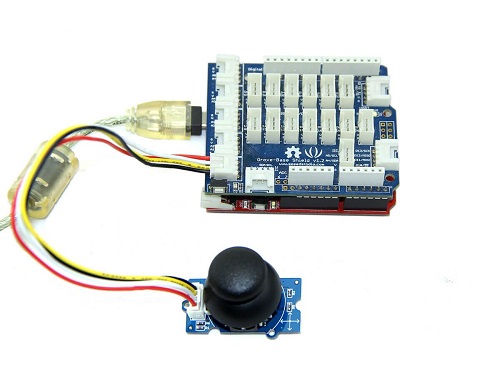
4.Copy and paste code below to a new Arduino sketch.
/*
Thumb Joystick demo v1.0
by:http://www.seeedstudio.com
connect the module to A0&A1 for using;
*/
void setup()
{
Serial.begin(9600);
}
void loop()
{
int sensorValue1 = analogRead(A0);
int sensorValue2 = analogRead(A1);
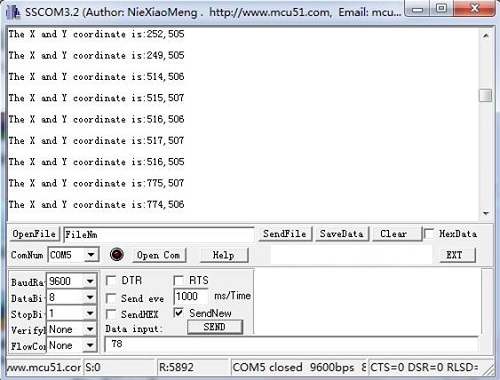
Serial.print("The X and Y coordinate is:");
Serial.print(sensorValue1, DEC);
Serial.print(",");
Serial.println(sensorValue2, DEC);
Serial.println(" ");
delay(200);
}
5.You can check the values of the output analog signals by opening the Serial Monitor.
The output value from the analog port of Arduino can be converted to the corresponding resistance by using the formula:R=(float)(1023-sensorValue)*10/sensorValue.
With Raspberry Pi
1.You should have got a raspberry pi and a grovepi or grovepi+.
2.You should have completed configuring the development environment, otherwise please follow here.
3.Connection
- Plug the sensor to grovepi socket A0 by using a grove cable.
 4.Navigate to the demos’ directory:
cd yourpath/GrovePi/Software/Python/
- To see the code
nano grove_thumb_joystick.py # "Ctrl+x" to exit #
    import time
    import grovepi

    # Connect the Grove Thumb Joystick to analog port A0

    # GrovePi Port A0 uses Arduino pins 0 and 1
    # GrovePi Port A1 uses Arduino pins 1 and 2
    # Don't plug anything into port A1 that uses pin 1
    # Most Grove sensors only use 3 of their 4 pins, which is why the GrovePi shares Arduino pins between adjacent ports
    # If the sensor has a pin definition SIG,NC,VCC,GND, the second (white) pin is not connected to anything

    # If you wish to connect two joysticks, use ports A0 and A2 (skip A1)

    # Uses two pins - one for the X axis and one for the Y axis
    # This configuration means you are using port A0
    xPin = 0
    yPin = 1
    grovepi.pinMode(xPin,"INPUT")
    grovepi.pinMode(yPin,"INPUT")

    # The Grove Thumb Joystick is an analog device that outputs analog signal ranging from 0 to 1023
    # The X and Y axes are two ~10k potentiometers and a momentary push button which shorts the x axis

    # My joystick produces slightly different results to the specifications found on the url above
    # I've listed both here:

    # Specifications
    #     Min  Typ  Max  Click
    #  X  206  516  798  1023
    #  Y  203  507  797

    # My Joystick
    #     Min  Typ  Max  Click
    #  X  253  513  766  1020-1023
    #  Y  250  505  769
    while True:
        try:
            # Get X/Y coordinates
            x = grovepi.analogRead(xPin)
            y = grovepi.analogRead(yPin)

            # Calculate X/Y resistance
            Rx = (float)(1023 - x) * 10 / x
            Ry = (float)(1023 - y) * 10 / y

            # Was a click detected on the X axis?
            click = 1 if x >= 1020 else 0

            print "x =", x, " y =", y, " Rx =", Rx, " Ry =", Ry, " click =", click
            time.sleep(.5)

        except IOError:
            print "Error"
5.Run the demo.
sudo python grove_thumb_joystick.py
Resources
| Arduino | Wio | BeagleBone | Raspberry Pi | LinkIt ONE |
|---|---|---|---|---|
Caution
The platforms mentioned above as supported is/are an indication of the module's hardware or theoritical compatibility. We only provide software library or code examples for Arduino platform in most cases. It is not possible to provide software library / demo code for all possible MCU platforms. Hence, users have to write their own software library.
Help us make it better
Welcome to the new documentation system of Seeed Studio. We have made a lot of progress comparing to the old wiki system and will continue to improve it to make it more user friendly and helpful. The improvement can't be done without your kindly feedback. If you have any suggestions or findings, you are most welcome to submit the amended version as our contributor via Github or give us suggestions in the survey below, it would be more appreciated if you could leave your email so that we can reply to you. Happy Hacking!