Grove - High Temperature Sensor
Introduction
Thermocouples are very sensitive devices. It requires a good amplifier with cold-junction compensation. The Grove - High Temperatire Sensor uses a K-Type themocouple and a thermocouple amplifier that measures ambient temperature using thermistor for cold-junction compensation. The detectable range of this Sensor is -50~600°C , and the accuracy is ±(2.0% + 2°C).

Version
| Product Version | Changes | Released Date |
|---|---|---|
| Grove - High Temperature Sensor V1.0 | Initial | Feb 25, 2014 |
Specifications
| Parameter | Value/Range |
|---|---|
| Operating Voltage | 3.3-5V |
| Max power rating at 25℃ | 300mW |
| Operating temperature range | -40 ~ +125 ℃ |
| Temperature measurement range | -50 ~ +600℃ |
| Amplifier output voltage range | 0 ~ 3.3 V |
| Thermocouple material | Glass Fiber |
| Cold junction compensation | Environment temperature measurement |
| Thermocouple temperature measurement accuracy | +/-2.0% (+ 2 ℃) |
| Thermocouple temperature sensor cable length | 100cm |
| Dimension | 20mm x 40mm |
Tip
More details about Grove modules please refer to Grove System
Platforms Supported
Getting Started
Play with Arduino
Hardware
- Step 1. We need to prepare the below stuffs:
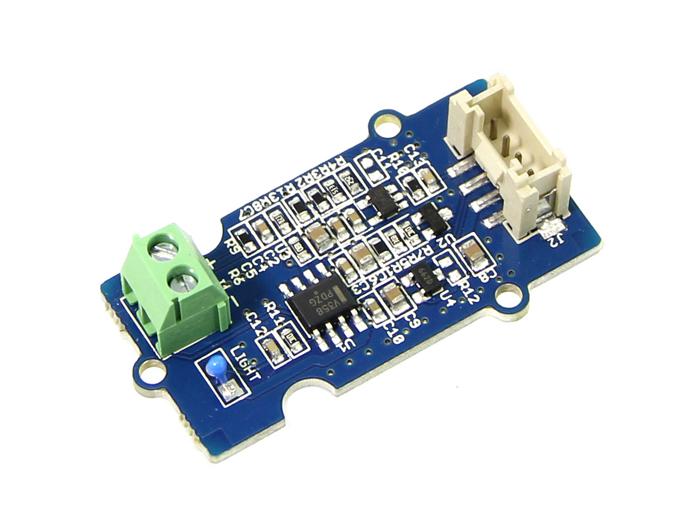
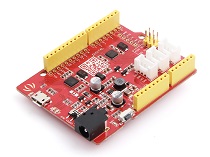
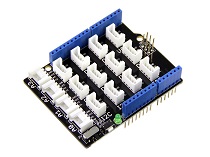
| Seeeduino V4.2 | Base Shield | Grove-High Temperature Sensor |
|---|---|---|
 |
 |
 |
| Get ONE Now | Get ONE Now | Get ONE Now |
- Step 2. Connect the Grove-High Temperature Sensor to A0 on Base Shield.
- Step 3. Plug the base Shield into Seeeduino-V4.2.
- Step 4. Connect Seeeduino-V4.2 to PC by using a USB cable.

Note
If we don’t have a Base Shield, don’t worry, the sensor can be connected to your Arduino directly. Please follow below tables to connect with Arduino.
| Seeeduino | Grove-High Temperature Sensor |
|---|---|
| GND | Black |
| 5V | Red |
| A1 | White |
| A0 | Yellow |
Software
- Step 1. Download the UltrasonicRanger Library from Github.
- Step 2. Refer How to install library to install library for Arduino.
- Step 3. Copy the code into Arduino IDE and upload.
#include "High_Temp.h"

HighTemp ht(A1, A0);

void setup()
{
    Serial.begin(115200);
    Serial.println("grove - hight temperature sensor test demo");
    ht.begin();
}

void loop()
{
    Serial.println(ht.getThmc());
    delay(100);
}
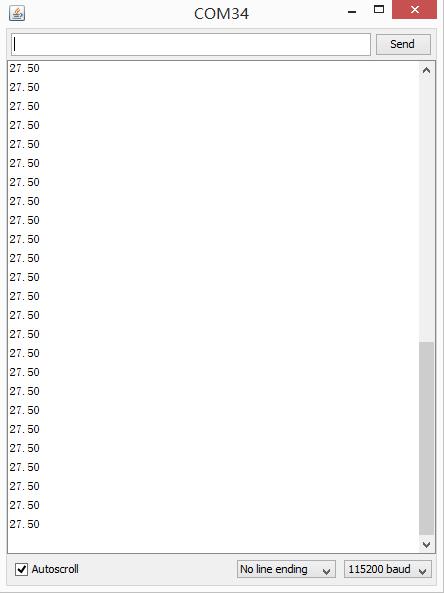
- Step 4. Open your Serial Monitor and set baud rate as 115200, We will see the temperature in Celsius here.
Play With Raspberry Pi
Hardware
- Step 1. Prepare the below stuffs:
| Raspberry pi | GrovePi_Plus | Grove - Ultrasonic Ranger |
|---|---|---|
 |
 |
|
| Get ONE Now | Get ONE Now | Get ONE Now |
- Step 2. Plug the GrovePi_Plus into Raspberry.
- Step 3. Connect Grove-Ultrasonic ranger to A0 port of GrovePi_Plus.
- Step 4. Connect the Raspberry to PC through USB cable.

Software
- Step 1. Follow Setting Software to configure the development environment.
- Step 2. Git clone the Github repository.
cd ~
git clone https://github.com/DexterInd/GrovePi.git
- Step 3. Excute below commands to use the ultrasonic_ranger to meansure the distance.
cd ~/GrovePi/Software/Python/grove_hightemperature_sensor
python high_temperature_example.py
Here is the grove_ultrasonic.py code.
import grove_hightemperature_sensor as grovepi # our library
from time import sleep # and for the sleep function
import sys # we need this for the exception throwing stuff

# Don't forget to run it with Python 3 !!
# Don't forget to run it with Python 3 !!
# Don't forget to run it with Python 3 !!

def Main():
    room_temperature_pin = 15 # this is equal to A1
    probe_temperature_pin = 14 # this is equal to A0
    # so you have to connect the sensor to A0 port

    # instatiate a HighTemperatureSensor object
    sensor = grovepi.HighTemperatureSensor(room_temperature_pin, probe_temperature_pin)

    # and do this indefinitely
    while True:
        # read the room temperature
        room_temperature = sensor.getRoomTemperature()
        # and also what's important to us: the temperature at the tip of the K-Type sensor
        probe_temperature = sensor.getProbeTemperature()

        # print it in a fashionable way
        print('[room temperature: {:5.2f}°C][probe temperature: {:5.2f}°C]'.format(room_temperature, probe_temperature))
        # and wait for 250 ms before taking another measurement - so we don't overflow the terminal
        sleep(0.25)


if __name__ == "__main__":
    try:
        Main()

    # in case CTRL-C / CTRL-D keys are pressed (or anything else that might interrupt)
    except KeyboardInterrupt:
        print('[Keyboard interrupted]')
        sys.exit(0)

    # in case there's an IO error aka I2C
    except IOError:
        print('[IO Error]')
        sys.exit(0)

    # in case we have a math error (like division by 0 - can happen depending on the read values)
    # or if the values exceed a certain threshold
    # experiment and you'll see
    except ValueError as e:
        print('[{}]'.format(str(e)))
        sys.exit(0)
- Step 4. We will see the temperature display on terminal as below.
pi@raspberrypi:~/GrovePi/Software/Python/grove_hightemperature_sensor $ python high_temperature_example.py
[room temperature: 20.47°C][probe temperature: 32.19°C]
[room temperature: 20.47°C][probe temperature: 32.19°C]
[room temperature: 20.47°C][probe temperature: 32.19°C]
[room temperature: 20.47°C][probe temperature: 32.19°C]
[room temperature: 20.60°C][probe temperature: 32.19°C]
[room temperature: 20.60°C][probe temperature: 32.19°C]
[room temperature: 20.60°C][probe temperature: 32.19°C]
FAQ
Please click here to see all Grove-High_Temperature_Sensor FAQs.
Tech Support
Please do not hesitate to contact techsupport@seeed.cc if you require further information.
Resources
- [PDF] Download Wiki PDF
- [PDF]Grove - High Temperature Sensor SCH PDF
- [PDF]Grove - High Temperature Sensor PCB PDF
- [Eagle]Grove - High Temperature Sensor Eagle SCH
- [Eagle]Grove - High Temperature Sensor Eagle PCB
- [Library]High Temperature Sensor Library
- [Datasheet]OPA333 PDF
- [Datasheet]LMV358 PDF
| Arduino | Wio | BeagleBone | Raspberry Pi | LinkIt ONE |
|---|---|---|---|---|
Caution
The platforms mentioned above as supported is/are an indication of the module's hardware or theoritical compatibility. We only provide software library or code examples for Arduino platform in most cases. It is not possible to provide software library / demo code for all possible MCU platforms. Hence, users have to write their own software library.
Help us make it better
Welcome to the new documentation system of Seeed Studio. We have made a lot of progress comparing to the old wiki system and will continue to improve it to make it more user friendly and helpful. The improvement can't be done without your kindly feedback. If you have any suggestions or findings, you are most welcome to submit the amended version as our contributor via Github or give us suggestions in the survey below, it would be more appreciated if you could leave your email so that we can reply to you. Happy Hacking!