Grove - CO2 Sensor
Introduction
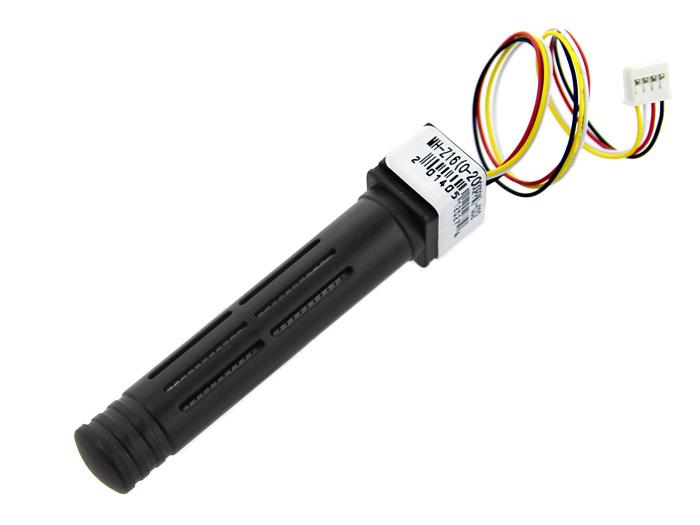
The Grove - CO2 Sensor module is infrared CO2 sensor high sensitivity and high resolution. Infrared CO2 sensor MH-Z16 Is a general-purpose, small sensors, the use of non-dispersive infrared (NDIR) Present in the principle of the air CO2 Detect, with good selectivity, oxygen- dependent, long life, built-in temperature sensor, temperature compensation, with UART output, easy to use. It can be widely used in HVAC and indoor air quality monitoring, industrial process monitoring and security, agriculture and livestock production process monitoring.

Caution
Note that the sensor value only reflects the approximated trend of gas concentration in a permissible error range. It DOES NOT represent the exact gas concentration. The detection of certain components in the air usually requires a more precise and costly instrument, which cannot be done with a single gas sensor. If your project is aimed at obtaining the gas concentration at a very precise level, then we do not recommend this gas sensor.Specifications
- Measuring the range of 0-2000 parts per million (PPM)
- Resolution of 1 PPM 0-2000 parts per million (PPM)
- Accuracy of 200 PPM
- A Warm - up time 3 minutes
- Response Time < 90s
- Operating temperature 0 to 50℃
- Operating Humidity 0% ~ 90% RH
- Storage temperature - 20-60℃
- Operating Voltage4.5 V to 6 V DC
- The Current maximum Current of less than 100 ma, the average Current of less than 50 ma
- Output mode UART
Tip
More details about Grove modules please refer to Grove System
Platforms Supported
Demonstration
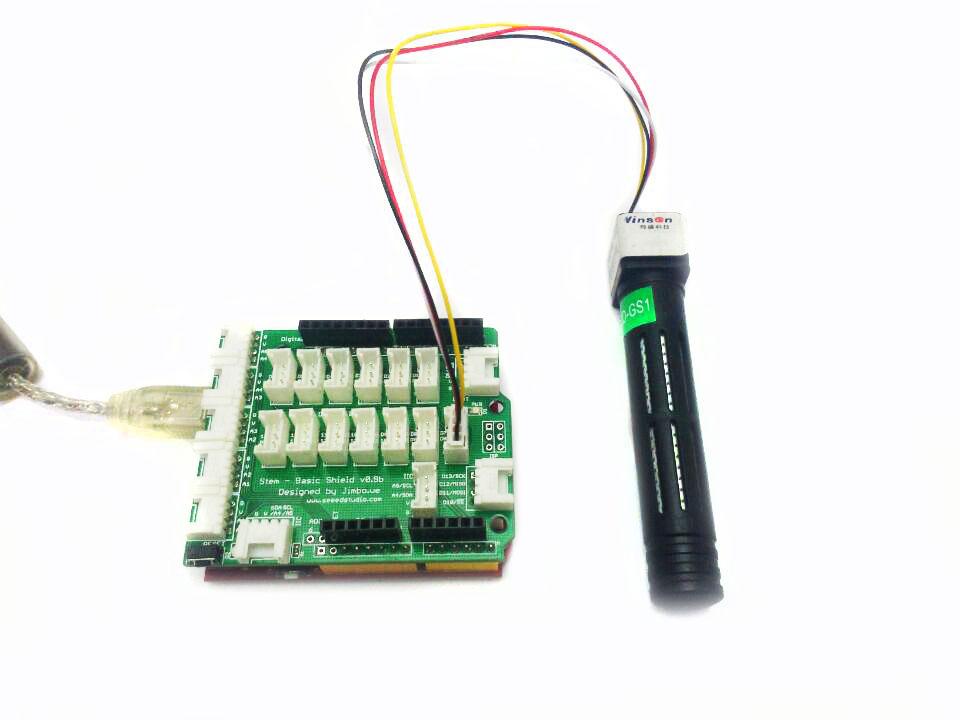
Connect the module with Grove Shield using like following picture and use the program below to gain the voltage.
Please note that the best preheat time of the sensor is about 180s. For the detailed information about the sensor, please refer to the datasheet.
/*
  This test code is write for Arduino AVR Series(UNO, Leonardo, Mega)
  If you want to use with LinkIt ONE, please connect the module to D0/1 and modify:

  // #include <SoftwareSerial.h>
  // SoftwareSerial s_serial(2, 3);      // TX, RX

  #define sensor Serial1
*/


#include <SoftwareSerial.h>
SoftwareSerial s_serial(2, 3);      // TX, RX

#define sensor s_serial

const unsigned char cmd_get_sensor[] =
{
    0xff, 0x01, 0x86, 0x00, 0x00,
    0x00, 0x00, 0x00, 0x79
};

unsigned char dataRevice[9];
int temperature;
int CO2PPM;

void setup()
{
    sensor.begin(9600);
    Serial.begin(115200);
    Serial.println("get a 'g', begin to read from sensor!");
    Serial.println("********************************************************");
    Serial.println();
}

void loop()
{
    if(dataRecieve())
    {
        Serial.print("Temperature: ");
        Serial.print(temperature);
        Serial.print("  CO2: ");
        Serial.print(CO2PPM);
        Serial.println("");
    }
    delay(1000);
}

bool dataRecieve(void)
{
    byte data[9];
    int i = 0;

    //transmit command data
    for(i=0; i<sizeof(cmd_get_sensor); i++)
    {
        sensor.write(cmd_get_sensor[i]);
    }
    delay(10);
    //begin reveiceing data
    if(sensor.available())
    {
        while(sensor.available())
        {
            for(int i=0;i<9; i++)
            {
                data[i] = sensor.read();
            }
        }
    }

    for(int j=0; j<9; j++)
    {
        Serial.print(data[j]);
        Serial.print(" ");
    }
    Serial.println("");

    if((i != 9) || (1 + (0xFF ^ (byte)(data[1] + data[2] + data[3] + data[4] + data[5] + data[6] + data[7]))) != data[8])
    {
        return false;
    }

    CO2PPM = (int)data[2] * 256 + (int)data[3];
    temperature = (int)data[4] - 40;

    return true;
}
Calibration
If you need to calibrate the sensor, please upload below code to your Arduino.
// Grove - Co2 Sensor calibration

#include <SoftwareSerial.h>
SoftwareSerial sensor(A5, A4);      // TX, RX


const unsigned char cmd_calibrate[] =
{
    0xff, 0x87, 0x87, 0x00, 0x00, 0x00, 0x00, 0x00, 0xf2
};

void setup()
{
    sensor.begin(9600);
    Serial.begin(115200);
    Serial.println("begin to calibrate");

    for(int i=0; i<sizeof(cmd_calibrate); i++)
    {
        sensor.write(cmd_calibrate[i]);
    }

    Serial.println("calibrate done");
}

void loop()
{
    // nothing to do
}
Warning
Please preheat the sensor for at least 5 minutes before calibrating and make sure the sensor in fresh air.
Reference
- 350~450ppm: General outdoor environment
- 350~1000ppm:The air is fresh and breathing smooth
- 1000~2000ppm:The air was stagnant and feel asleep
- 5000ppm:Permissible exposure limit for an 8h work day
Resources
- MH-Z16_CO2 datasheet_ZH_CN.pdf
- MH-Z16_CO2 datasheet_EN.pdf
- Health Risk Evaluation for Carbon Dioxide
| Arduino | Wio | BeagleBone | Raspberry Pi | LinkIt ONE |
|---|---|---|---|---|
Caution
The platforms mentioned above as supported is/are an indication of the module's hardware or theoritical compatibility. We only provide software library or code examples for Arduino platform in most cases. It is not possible to provide software library / demo code for all possible MCU platforms. Hence, users have to write their own software library.
Help us make it better
Welcome to the new documentation system of Seeed Studio. We have made a lot of progress comparing to the old wiki system and will continue to improve it to make it more user friendly and helpful. The improvement can't be done without your kindly feedback. If you have any suggestions or findings, you are most welcome to submit the amended version as our contributor via Github or give us suggestions in the survey below, it would be more appreciated if you could leave your email so that we can reply to you. Happy Hacking!