Grove - 125KHz RFID Reader
Introduction
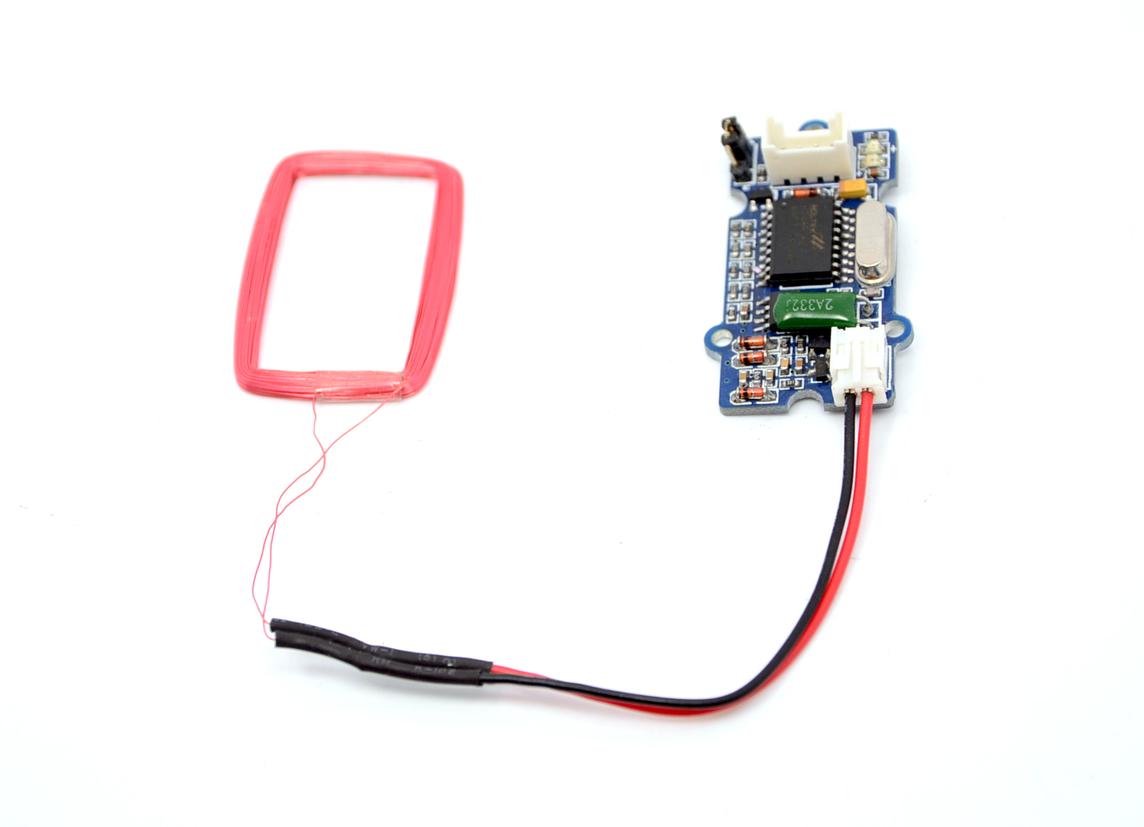
This Grove-125KHz RFID Reader is a module used to read uem4100 RFID card information with two output formats: Uart and Wiegand. It has a sensitivity with maximum 7cm sensing distance. There is also the electronic brick version of this module. It can help you with project like internet of thing and access control system.
And you should use the module below while using RFID reader:

Specifications
- Voltage: 4.75-5.25V
- Working Frequency: 125 KHz
- Sensing Distance(Max): 70mm
- TTL Output: 9600 baudrate, 8 data bits, 1 stop bit, and no verify bit
- Wiegand Output: 26 bits Wiegand format, 1 even verify bit, 24 data bits, and 1 odd verify bit
Tip
More details about Grove modules please refer to Grove System
Platforms Supported
Demonstration
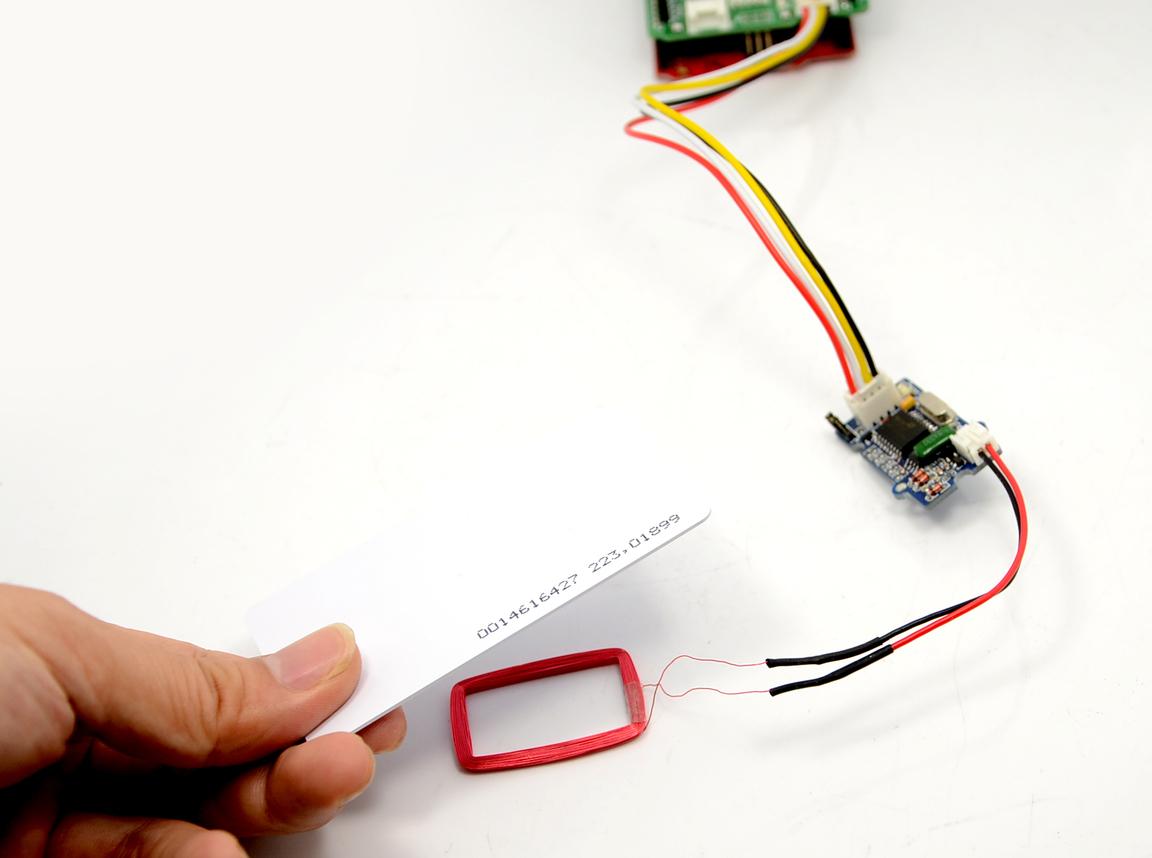
Here we show how to read RFID information using the Grove - 125KHz RFID Reader. Connect Grove - 125KHz RFID Reader to UART of Grove - Base Shield.
Uart Mode (Jumper set to the left two pins)
You would need to select the jumper to “U” to enter this mode, and the setting is: 9600bps, N, 8, 1, TTL output
/*
  link between the computer and the SoftSerial Shield
  at 9600 bps 8-N-1
  Computer is connected to Hardware UART
  SoftSerial Shield is connected to the Software UART:D2&D3
*/

#include <SoftwareSerial.h>

SoftwareSerial SoftSerial(2, 3);
unsigned char buffer[64];       // buffer array for data receive over serial port
int count = 0;                    // counter for buffer array

void setup()
{
    SoftSerial.begin(9600);     // the SoftSerial baud rate
    Serial.begin(9600);         // the Serial port of Arduino baud rate.
}

void loop()
{
    // if date is coming from software serial port ==> data is coming from SoftSerial shield
    if (SoftSerial.available())
    {
        while(SoftSerial.available())               // reading data into char array
        {
            buffer[count++] = SoftSerial.read();      // writing data into array
            if(count == 64)break;
        }
        Serial.write(buffer, count);     // if no data transmission ends, write buffer to hardware serial port
        clearBufferArray();             // call clearBufferArray function to clear the stored data from the array
        count = 0;                      // set counter of while loop to zero
    }
    if (Serial.available())             // if data is available on hardware serial port ==> data is coming from PC or notebook
    SoftSerial.write(Serial.read());    // write it to the SoftSerial shield
}
void clearBufferArray()                 // function to clear buffer array
{
    // clear all index of array with command NULL
    for (int i=0; i<count; i++)
    {
        buffer[i]=NULL;
    }
}
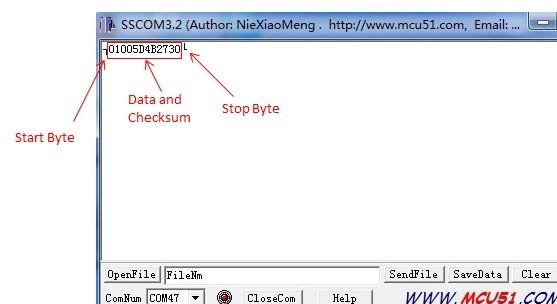
Open the Serial Monitor, the card information can be displayed as shown below:
Wiegand Mode (Jumper Set to the Right two Pins)
You would need to select the jumper to “W” to enter this mode. The Wiegand demo code for Seeeduino is designed to read Wiegand data in interrupt mode.
In Wiegand Mode, output data is formatted with 26bits including 24bits card info and 2 bits parity.
| bit | 0 | 1 | 2 | 3 | 4 | 5 | 6 | 7 | 8 | 9 | 10 | 11 | 12 | 13 | 14 | 15 | 16 | 17 | 18 | 19 | 20 | 21 | 22 | 23 | 24 | 25 |
| - | PE | D | P0 | |||||||||||||||||||||||
| - | - | E | 0 | - | ||||||||||||||||||||||
| - | - | D2[7..0] | D1[7..0] | D0[7..0] | - | |||||||||||||||||||||
- PE is even bit, PO is odd bit;
- E is the data bit which was involved in even, O is the data bit which was involved in odd;
- DX[7..0] is the data bit which correspond to Mifare@ Standard & Light card read only ID;
How to convert the output to Card Number
Take ID: 0009776930 for example:
- Card Number ID: 0009776930 ------- Decimalism [Start Bit(00) + Card Number(8 numbers)]
- Output: 0700952F229F ------------- Hex [[Start Bit(07h) + Card Number(8 numbers) + Checksum]
- The calculator for decimal and hex numbers is available online.
| Arduino | Wio | BeagleBone | Raspberry Pi | LinkIt ONE |
|---|---|---|---|---|
Caution
The platforms mentioned above as supported is/are an indication of the module's hardware or theoritical compatibility. We only provide software library or code examples for Arduino platform in most cases. It is not possible to provide software library / demo code for all possible MCU platforms. Hence, users have to write their own software library.
Help us make it better
Welcome to the new documentation system of Seeed Studio. We have made a lot of progress comparing to the old wiki system and will continue to improve it to make it more user friendly and helpful. The improvement can't be done without your kindly feedback. If you have any suggestions or findings, you are most welcome to submit the amended version as our contributor via Github or give us suggestions in the survey below, it would be more appreciated if you could leave your email so that we can reply to you. Happy Hacking!