BLE Carbon
Introduction

The BLE Carbon is joint efforts by 96Boards and Seeed, aims to provide economic and compact BLE solutions for IoT projects.
96Boards is produced by Linaro, a nonprofit oganization cofunded by famous companies including ARM, IBM、Samsung、ST-Ericsson and TI. It is the first open specification to define a platform for the delivery of compatible low-cost, small footprint 32-bit and 64-bit Cortex-A boards from the range of ARM SoC vendors. By standardizing expansion buses for peripheral I/O, display and cameras, it allows the hardware ecosystem to develop a range of compatible add-on products that will work on any 96Boards product over the lifetime of the platform.
BLE Carbon is the kind of boards that uses software platform from 96Boards while the hardware from Seeed, it also uses the Nordic bluetooth solution. With the widely used open specification and strong manufacturing background from 96Boards and Seeed, BLE Cardon must be one of the best BLE solutions for IoT project.
The Carbon comes pre-installed with Zephyr. When future OS become available, you may refer to the download page for more OS and applications.

Features
Microcontroller features
- STM32F401RET6 in LQFP64 package
- ARM?32-bit Cortex?-M4 CPU with FPU
- 84 MHz max CPU frequency
- VDD from 1.7 V to 3.6 V
- 512 KB Flash
- 96 KB SRAM
- GPIO (50) with external interrupt capability
- 12-bit ADC with 16 channels
- RTC
- Advanced-control Timer
- General Purpose Timers (7)
- Watchdog Timers (2)
- USART/UART (4)
- I2C (3)
- SPI (3)
- SDIO
- USB 2.0 OTG FS
Board features
- STM32F401 microcontroller with 512kB Flash, 96kB ram
- USB power supply with fuse protect
- 6LEDs
- USR1, USR2, BT, PWR, RX, TX
- Two push buttons
- USR and RESET
- SWD debug connectors
- On board chip antenna
- 3.3V work voltage
- 2x15pin 2.54mm pitch Low speed connector
- Fully compatible with 96Boards IoT standards
Specifications
| Parameter | Value |
|---|---|
| Chipset | STM32F401 |
| BT | nRF51822 |
| Clock Speed | 84MHz max CPU frequency |
| Flash | 512KB |
| SRAM | 96KB |
| Digital Output Voltage | 3.3V |
| Analog Pins | 6 |
| Analog Input Voltage | 0~3.3V |
| Dimensions | 60x30mm |
Hardware Overview
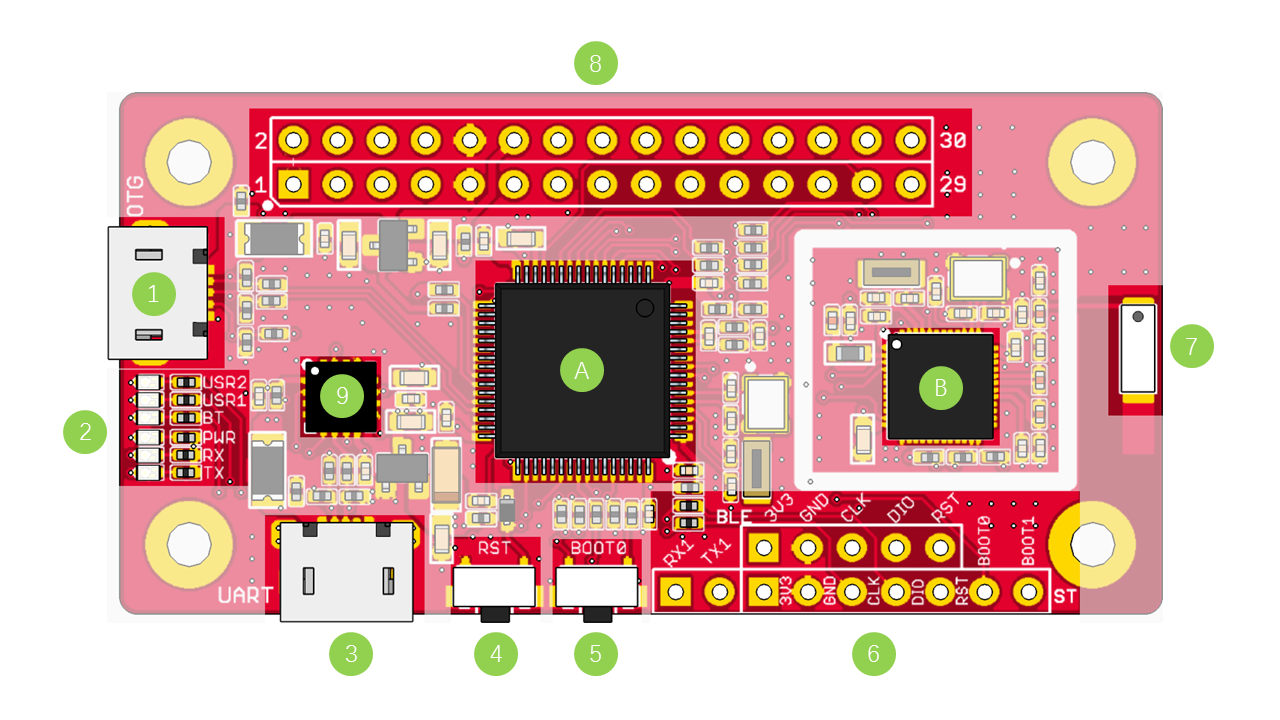
1.OTG - Can be used as USB OTG/HOST and USB device, also used for USB DFU.
2.LED Indicators
- USR1 - User controlled led, connected to PD2
- USR2 - User controlled led, connected to PA15
- BT - Bluetooth indicator, connected to PB5. This led will light up when connect to a device.
- PWR - Light up when Power on.
- RX - Indicator of FT230X - RX
- TX - Indicator of FT230X - TX
3.UART - for debugging or firmware update, connected to USART1.
4.Reset Button - Press to reset the system
5.BOOT0 Button - user button or select boot mode, connect to PC12, default low.
6.UART and SWD for debug (STM32F401 and nRF51822 both)
7.BT Chip antenna
8.Pins - Details refer to Pin map
9.IC1 - FT230X
A.IC2 - STM32F401
B.IC3 - nRF51822
Pin Map
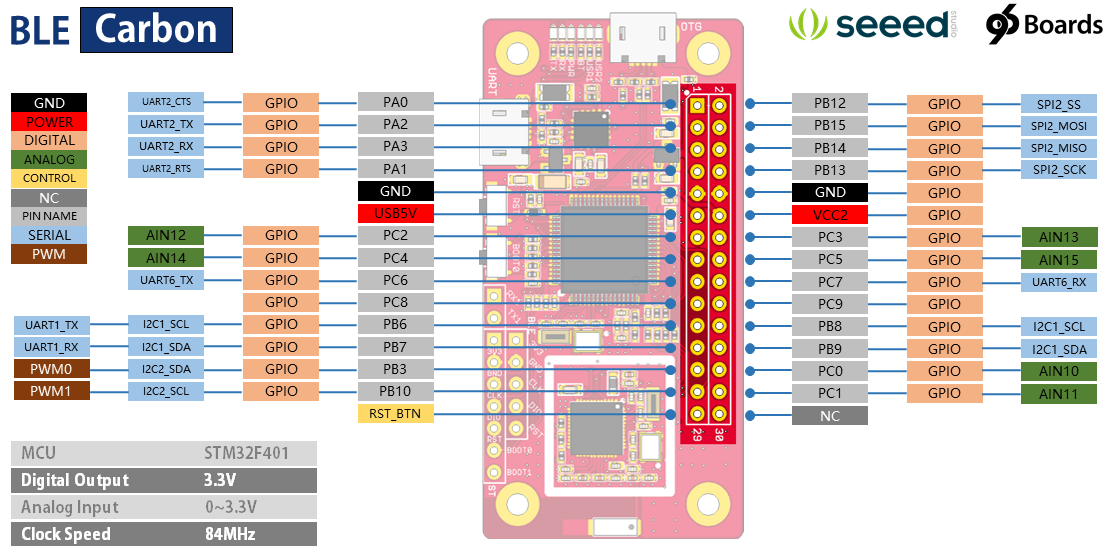
Note
Click to view larger image.
Connection between nRF51822 and STM32F401
If you want to use a BLE SoftDevice in applications that cannot be ported to nRF5, for example because they use specific peripherals or need more resources like RAM, flash memory, or CPU sped, you should consider using serialization.
Hardware connection
Hardware connection as below:
| STM32F401 | nRF51822 | function |
|---|---|---|
| PA4 | P0.25 | SPI_CSN |
| PB1 | P0.28 | SPI_REQ |
| PB0 | P0.29 | SPI_RDY |
| PA7 | P0.00 | SPI_MOSI |
| PA6 | P0.30 | SPI_MISO |
| PA5 | P0.07 | SPI_CLK |
| PB2 | SWDIO/NRESET | RESET |
Serialization software setup
Prepare the connectivity board by performing the following steps:
- Connect the board to the computer and make sure that the RESET wire is disconnected.
- Program the SoftDevice on the connectivity board. See Programming SoftDevices for instructions.
- In Keil, open the Connectivity Example for the physical transport layer that you want to use:
\examples\ble_central_and_peripheral\ble_connectivity\board\ser_s13x_spi - Compile the application and download the created.hex file to the connectivity board.
For more details, please refer to Running a serialized application
How to upgrade firmware
DfuSe demonstration procedures
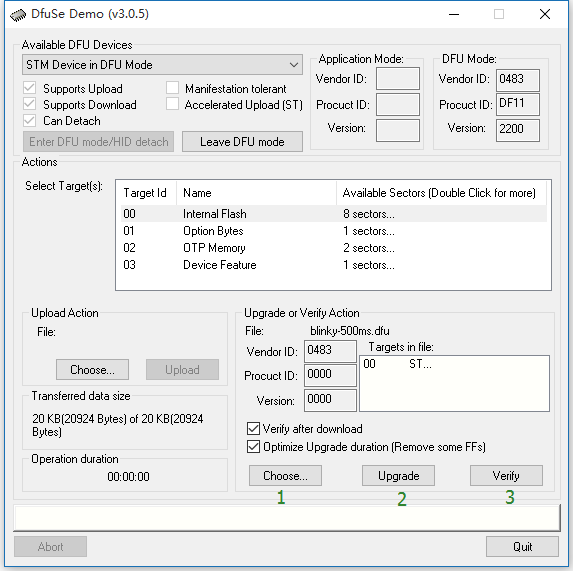
How to download a DFU file
- Press BOOT0 button and connect OTG to your PC.
- Run the DfuSe demonstration application (Start -> All Programs -> STMicroelectronics -> DfuSe Demonstration).
- Click the Choose button (Item 1 in following figure) to select a DFU file. the displayed Information such as VID, PID, Version and target number is read from the DFU file.
- Check the Optimize upgrade duration checkbox to ignore FF blocks during the upload.
- Check the Verify after download checkbox if you want to launch the verification process after downloading data.
- Click the Upgrade button (Item 2 in following figure) to start upgrading file content to the memory.
- Click the Verify button (Item 3 in following figure) to verify if the data was successfully downloaded.
How to generate DFU files from S19/Hex/Bin files
- Run the DFU File Manager application (Start -> All Programs -> STMicroelectronics -> DFU File Manager).
- Select I want to GENERATE a DFU file from S19, HEX or BIN files item in the Want to do dialog box hen click OK.
- To create the image from an S19 or Hex file, click the S19 or Hex button and select your file, a DFU image will be created for each added file.
- To create the DFU file, click Generate.
Note
For more details, please to read the user manual(UM0412) from ST.
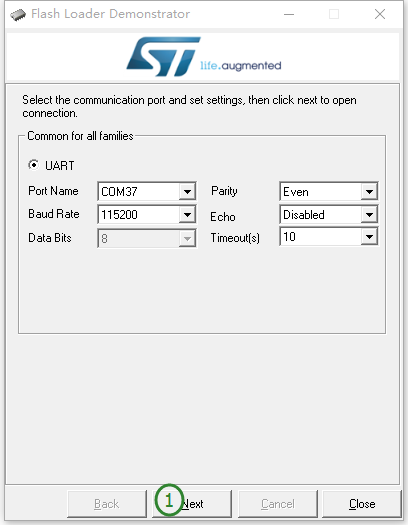
6.2 Download a hex file through UART
- Press BOOT0 button and connect UART to your PC.
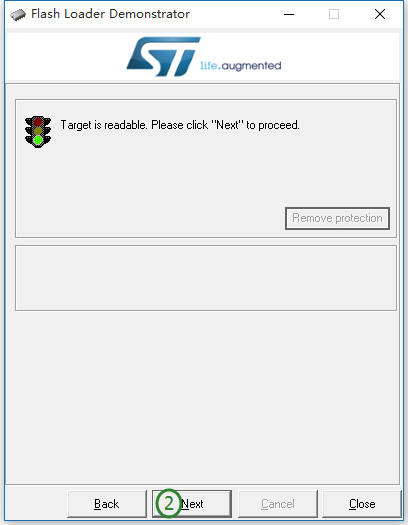
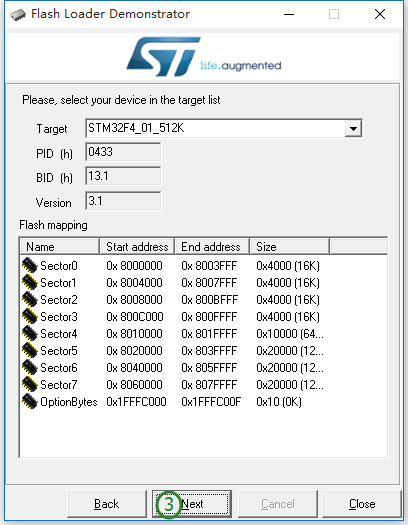
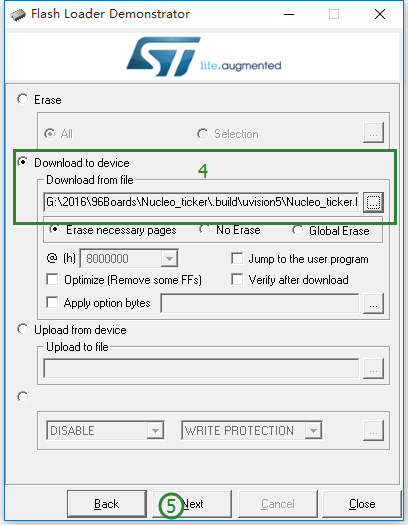
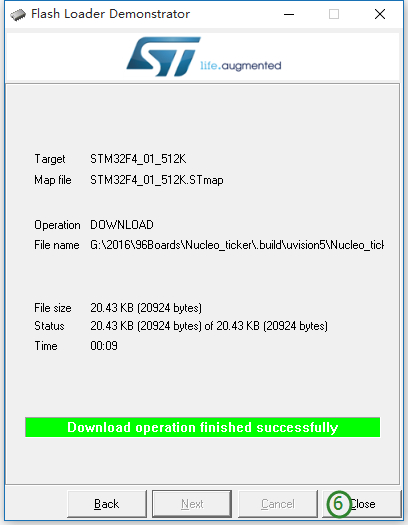
- Run the Demonstrator GUI application (Start -> All Programs -> STMicroelectronics -> Demonstrator GUI).
- Follow the steps below to download the firmware.
Resources
Help us make it better
Welcome to the new documentation system of Seeed Studio. We have made a lot of progress comparing to the old wiki system and will continue to improve it to make it more user friendly and helpful. The improvement can't be done without your kindly feedback. If you have any suggestions or findings, you are most welcome to submit the amended version as our contributor via Github or give us suggestions in the survey below, it would be more appreciated if you could leave your email so that we can reply to you. Happy Hacking!